
For those who think that the family is everything, they take care and pay attention to all the details that are at home to make cohabitation more special and meaningful, today we bring you a series of String Arts inspired by the family. the word “family” is the most important, but also how it is represented: with photos, with birds, with a tree … pay attention to these wonderful artworks. We hope you like them!
FAMILY STRING ART PATTERN
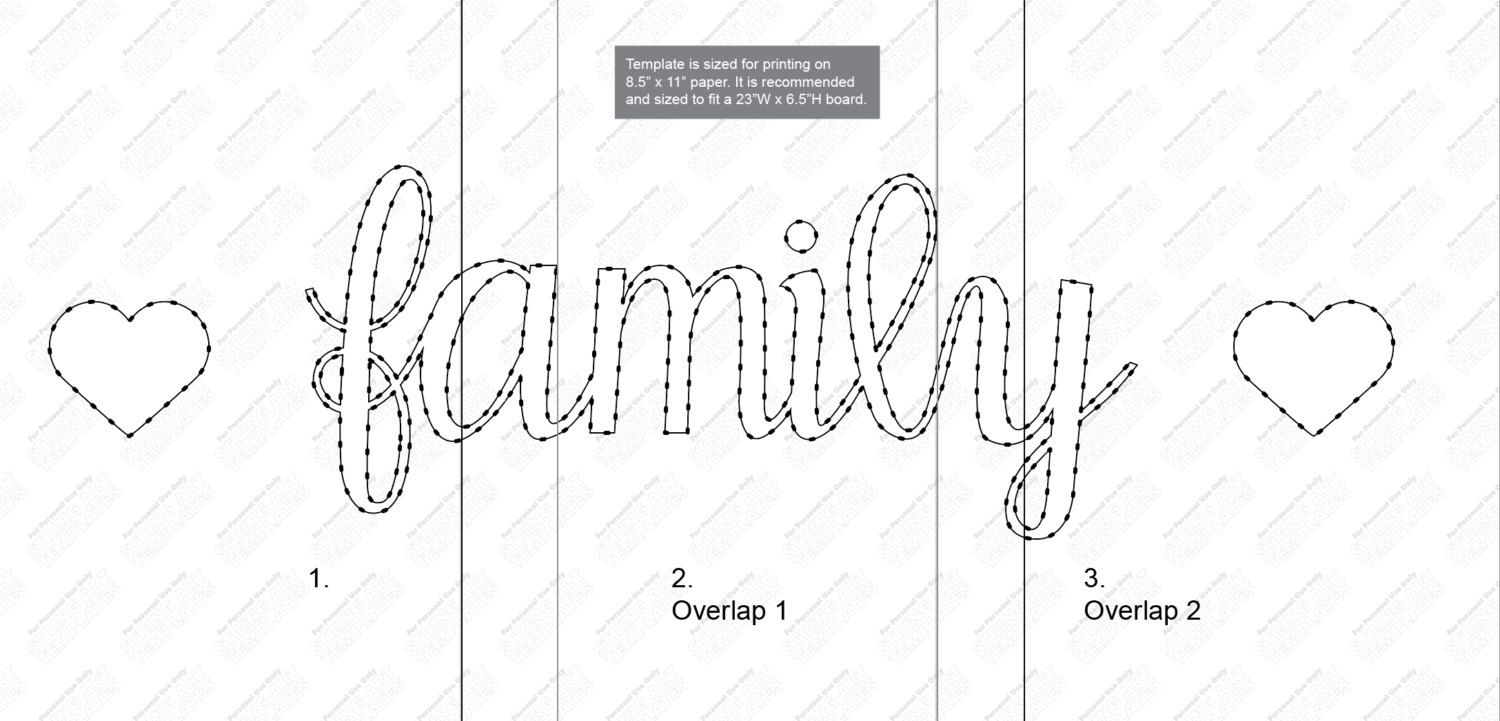
First of all, we bring you a pattern with the word “family” in a nice handwritting typography that you can download for free. If you click on the image, it will open in a new tab to a larger size. Source: Etsy.
FAMILY STRING ART
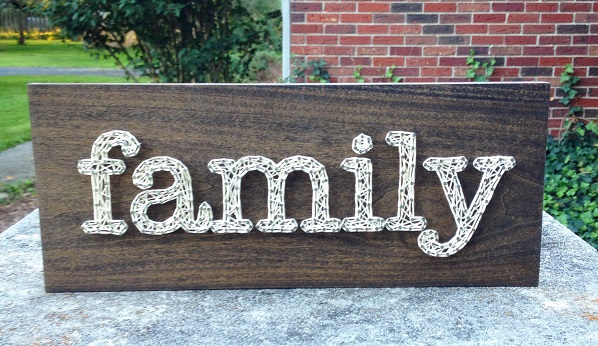
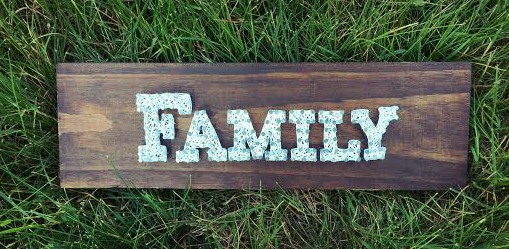
So let’s start with a series of Family String Art where the word “Family” is the most relevant and is written with different fonts: more classic but with rainbow colors, more modern and minimalist in a single color or more traditional and uppercase .
Source: TheHonakerHomeMaker
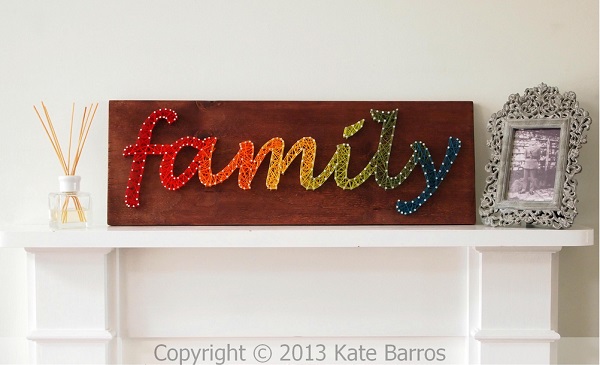
Source: Kate Barros
Source: It’s Better Handmade
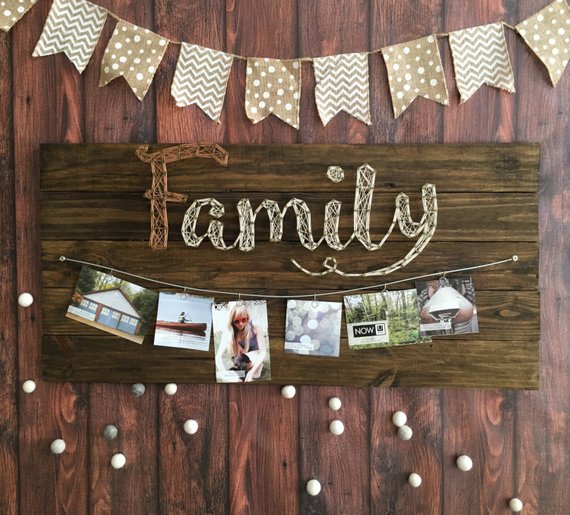
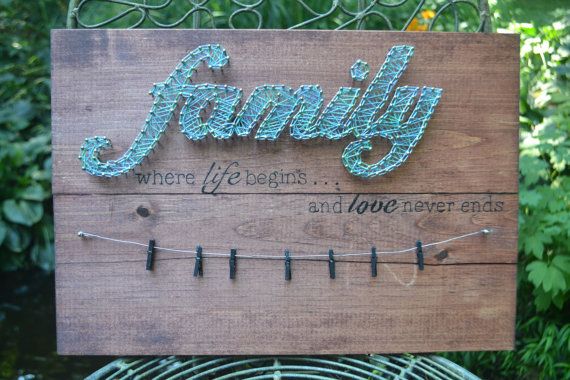
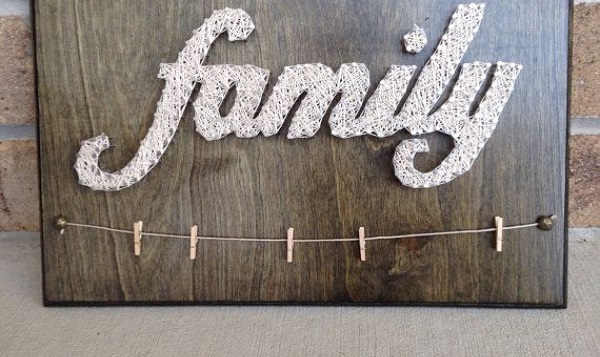
FAMILY AND PHOTOS STRING ART
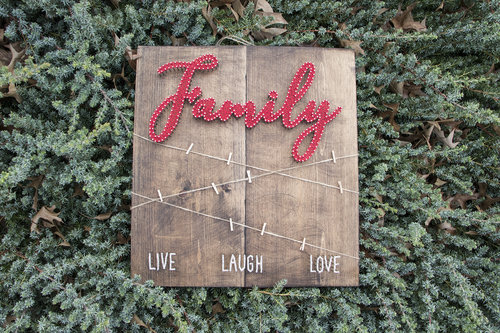
There are many ways to customize a Family String Art. One of them is to hang strings and small clothespins and hang photos of the couple or the family on it to make it unique and special. Look at the different colors (white, mint, red…), fonts and sentences that can be added, such as “live, love and laugh” or “with life begins … and love never ends”. Let’s see some examples that are really nice and cute.
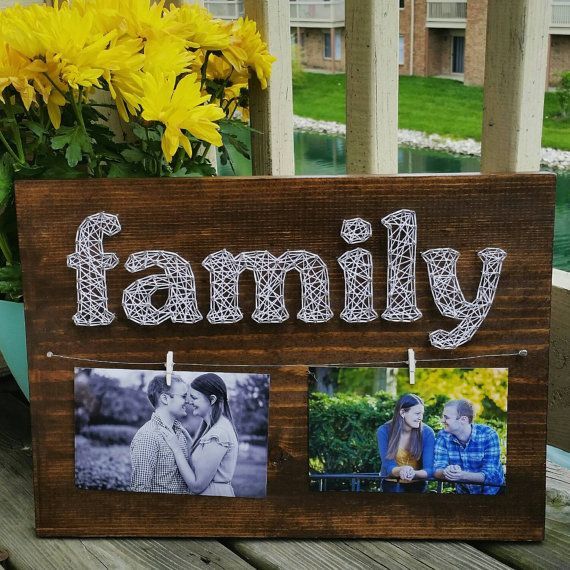
Source: Pinterest
Source: CustomizedByAshley
Source: LittleStringandThing
Source: StringTheNails
Source: Gabriel Clemons Design
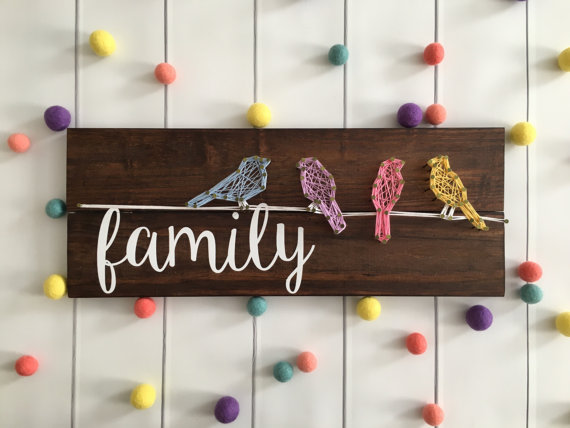
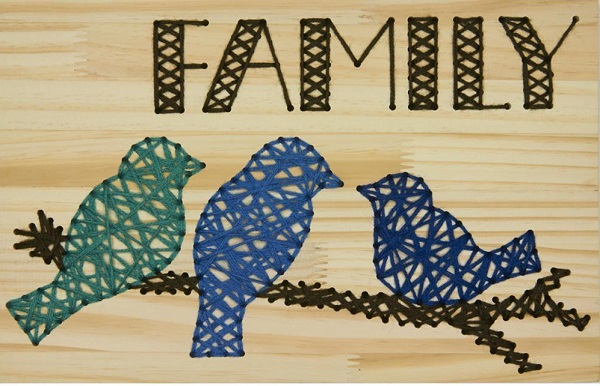
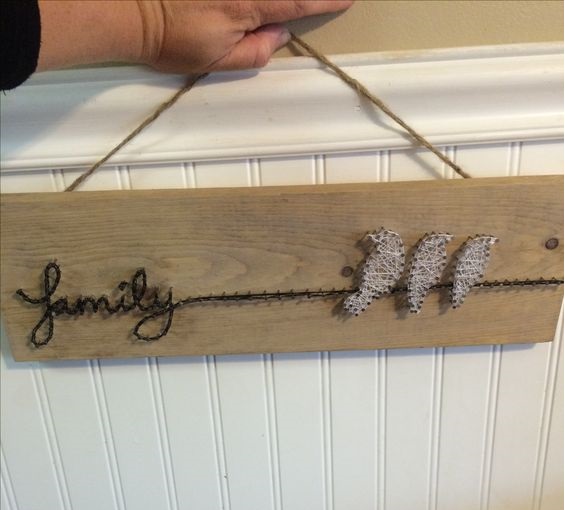
FAMILY AND BIRDS STRING ART
Another way for represent the family is through the figure of birds on a branch, which is a beautiful metaphor of family life: they are all together on the same branch or home. We encourage you to make String Arts with colorful birds, because we think it can look very nice. Connect the line of the writing with the one of the cable or branch where the birds rest is a very original design, as you can see on the third picture.
Source: Ebay
Source: Pinterest
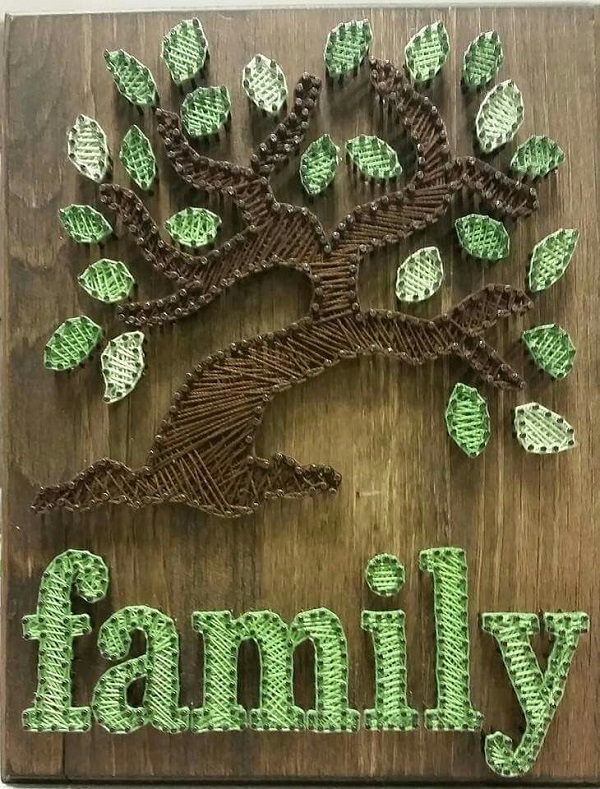
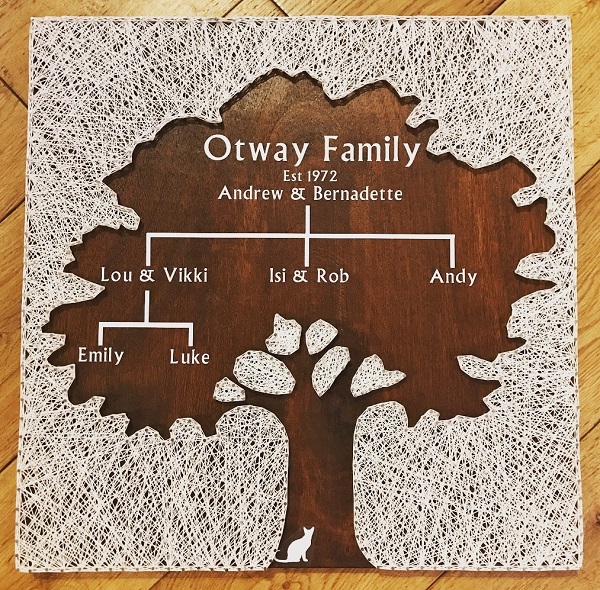
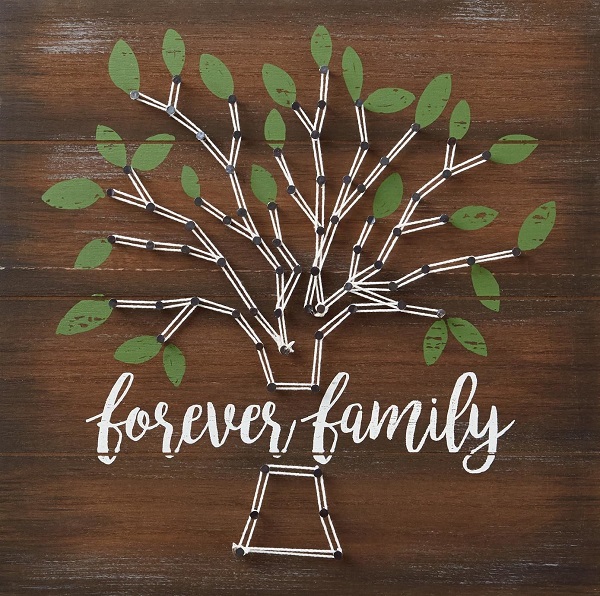
FAMILY TREE STRING ART
We finish this selection with another beautiful way of representing the family: with a family tree. Pay attention that the design of the tree can be in different ways, from a realistic tree, to one that is only a silhouette and inside are the real names of the family tree or you can make the trunk with string Art and paint the leaves and letters. You choose!
Source: Pinterest
Source: TimberandThreadGB
Source: Hallmark
We sincerely hope that you have enjoyed these Family String Art and that among all these designs there is one that you really love and you want to DIY to decorate your home and to remember all the members of your family that are special and dear ones.
In case you have any questions, comments or suggestions, please leave us a comment below and we will answer as soon as possible.
Hi, guys! How are you doing? As we have already told you several times in this blog, String Art can be make on different supports or surfaces. The most common is wood, but you can also make it on a wall, on cardboard or on canvas. Today we are going to speak about make String Art DIY on canvas , since it has many advantages. First of all, it is easier and more comfortable to do, since you do not have to nail nails into wood, but into canvas fabric. In fact, if you want to, you can use very small nails or even pins or thumbtacks, as we will see in the images below. On the other hand, you can make very special String Art using personalised canvas so you can give an extra 3D sensation for the picture or to create an awesome background with the design or photo you wish. So we are going to see a few images of String Art made on canvas and you will see their particularities and differences respect to ones made on wood.
As we have said, you can customize the canvas yourself or order a personalised canvas with a photo or a design on the Internet. In this case, they have made a modern graffiti background.
In this other String Art the background is personalised with printed sentences in blue and stamps that complement the marine and travel essence of the piece.
The canvas can be the size you want and the color you want. In this piece of work they have decided to personalise the canvas with black fabric and they have made a String Art of a simple star using red thread.
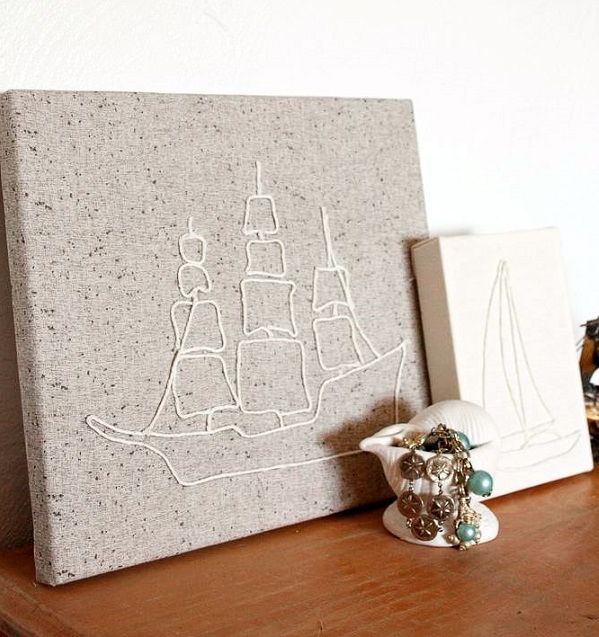
Pay attention at this String Art because it is different from the rest. First, because they have chosen a printed and customized fabric for the background and, second, because the technique is different. The boat shape is made with thread or string, yes, but glued to the canvas fabric!

In this case the background is not personalised but we want to show you that it is a String Art on canvas and that thumbtacks have been used instead of nails and the result is cool.
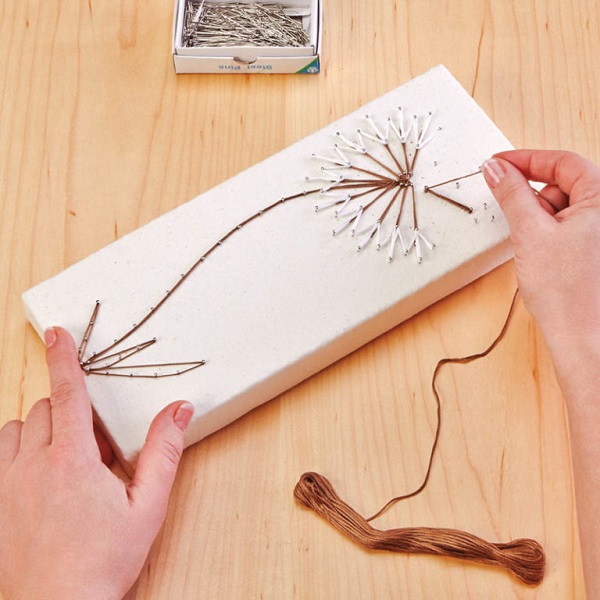
Here you have a small and delicate dandelion String Art on canvas and the special thing about this technique is that pins are used and gives the feeling that it is an embroidery.
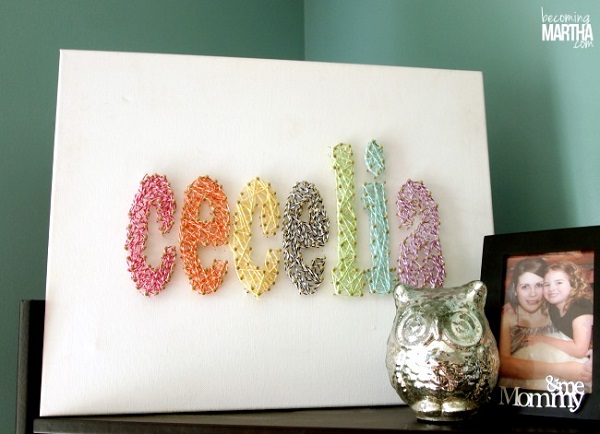
Here we have a String Art with the name Cecilia. We think that it would have been a good idea to personalise the canvas with a photo of the person you are going to give the String Art as a gift.

Summer is my favorite time of year when it comes to fruit. I love to refresh myself eating watermelon and other summer fruits, so today I decided to look for summer fru8its String Art DIy to propose to you. In this way, we can decorate a room in our hone in a fresh, colorful, fun and full of life way.
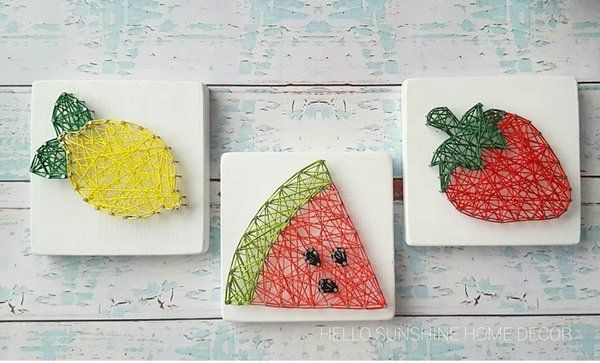
So let’s take a look at some String Arts with different summer fruits like watermelon, strawberry, lemon, pineappple, cherry and peach. Let’s see if you like them!
WATERMELON STRING ART
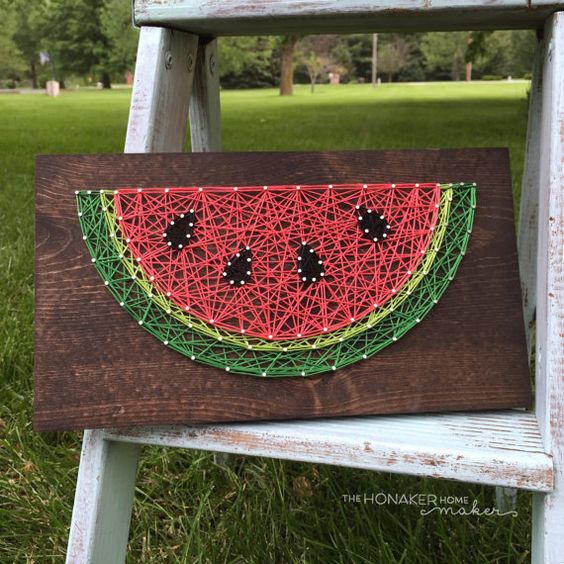
We start with this watermelon slice String Art made by Laura Honaker. I think this is the most refreshing design of all and it can look good in the kitchen, in the living room or even in a teenager bedroom. The design is simple and very colorful, so we recommend it as a summer String Art.
STRAWBERRY STRING ART
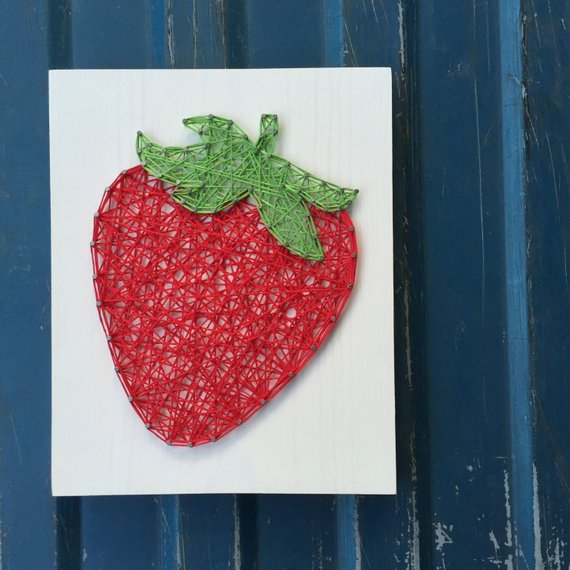
Another of my favorite fruits of spring and summer are strawberries. Its vivid color makes it very attractive. Look at this String Art by TheHonakerHomeMaker because it’s great, simple and a good choice to decorate a fruit store, but also to decorate a kitchen or a girl bedroom.
PINEAPPLE STRING ART
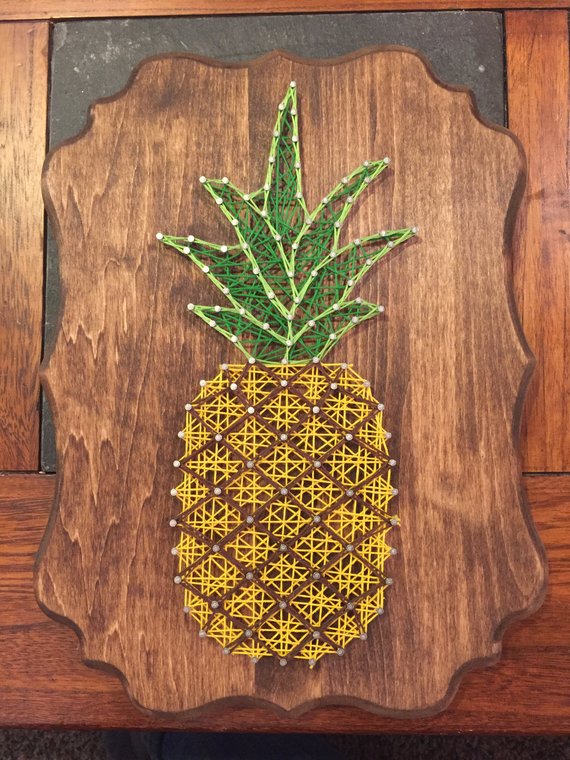
The pineapples are so fun! Its shape is very original and its color is vibrant. We love this very worked design, full of details, it almost looks like a cross stitch. It is a design by String Kits.
LEMON STRING ART
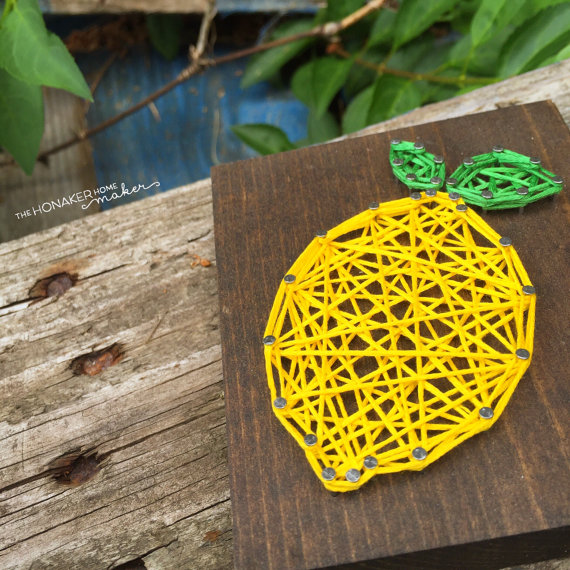
Lemons! I could not live without lemonade in summer! It is another of the most summery and refreshing fruits. In addition, the yellow color reminds of the summer sun and it is a good option to make a design in this season of the year. You can buy it in TheHonakerHomeMaker Etsy Shop or DIY.
CHERRY STRING ART
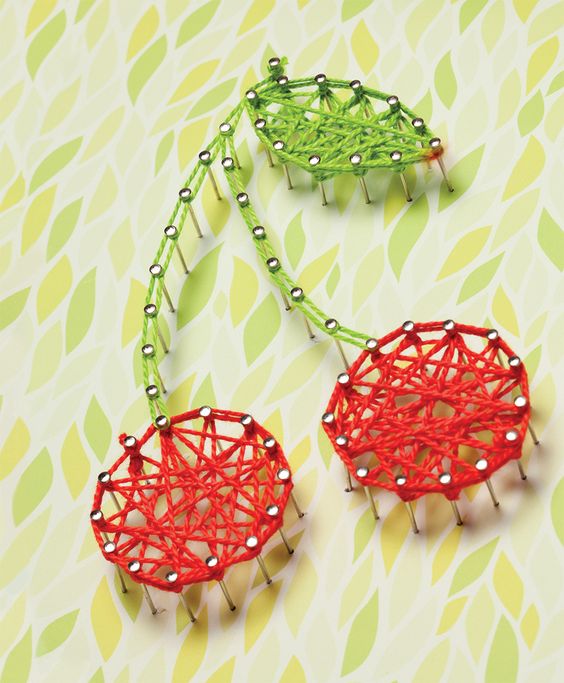
The two cherries are a charming and beautiful design, i feel I can say almost a “coquettish” design. As we can see, the shape is very simple, but the result looks great. You can learn how to make it at Klutz Strign Art book.
PEACH STRING ART
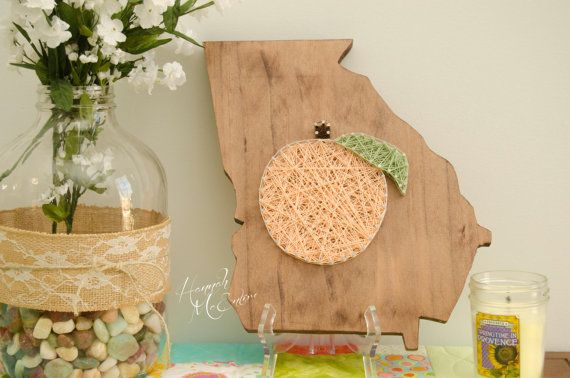
What about peaches? its flavour is so special and summer is its time. Look at this McEntireRustics peach String Art on a Georgia state map. You can use a light orange thread or a more vivid one.
I hope that you have enjoyed these summer fruits String Arts and now you are fancy doing one of these designs. Have a good summer and see you soon!

Hi, guys! How are your String Arts doing? As you maybe already know, in our previous post Marvelous Louisiana Themed String Arts we saw Louisiana state String Art, but today we are fancy showing you more String Art States and we have chosen 10 states from the United States of America. We are really sorry if we are not showing the state where you live in, maybe in the next posts, ask us for more! So let’s see some of them. Enjoy it!
TEXAS STRING ART
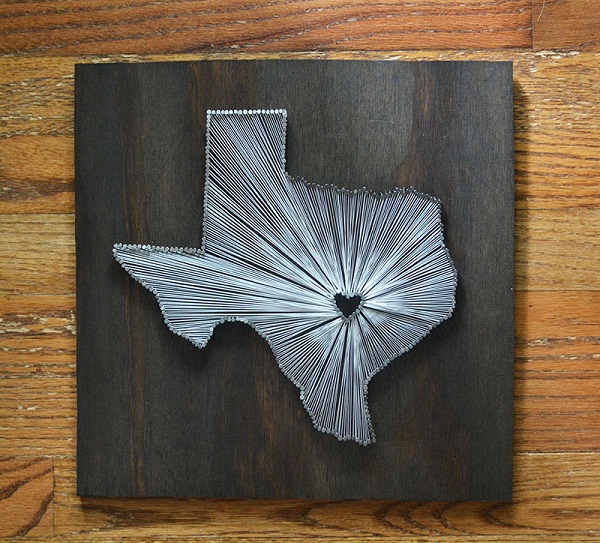
We start with the Texas String Art. As you can see, it looks great with white threads on a dark wood background and a heart shape in the middle or poiting at your city or home town. You can buy it in Etsy or DIY because it’s very easy.
SOUTH CAROLINA STRING ART
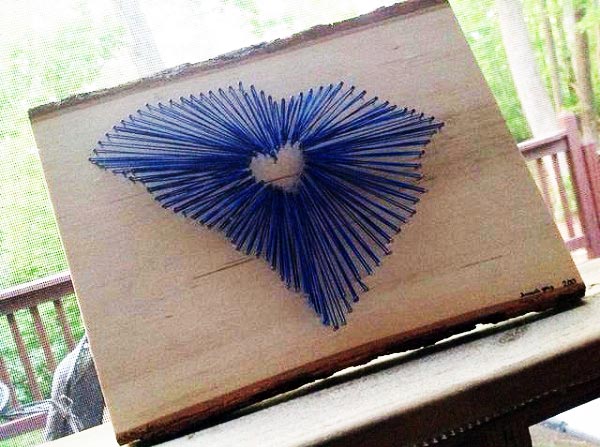
Here you have a South Carolina String Art made with threads of a deep blue color on light wood. It also has a blank with the shape of a heart in the middle. You can learn how to do it step by step at Snap Guide.
WISCONSIN STRING ART

As you can see in this image, this Wisconsin map String Art created with yellow threads on a deep green wooden background is also very creative and beautiful. You can see the steps to learn how to make this Winsconsing String Art at Crafts by Amanda.
MASSACHUSETTS STRING ART
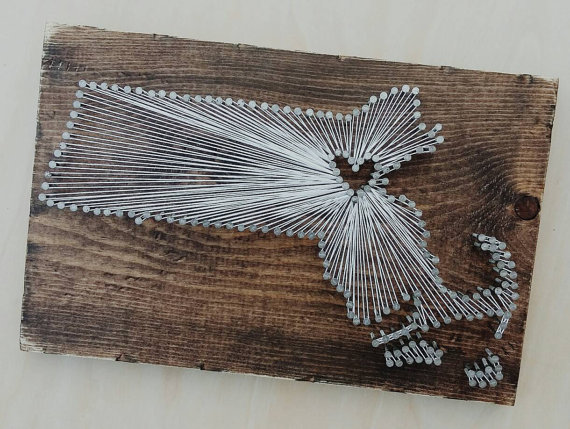
The shape of the state of Massachusets is a bit strange but it also looks good with white threads on dark wood background and a heart where Boston is located. You can do it yourself or but it at Etsy shop.
CALIFORNIA STRING ART
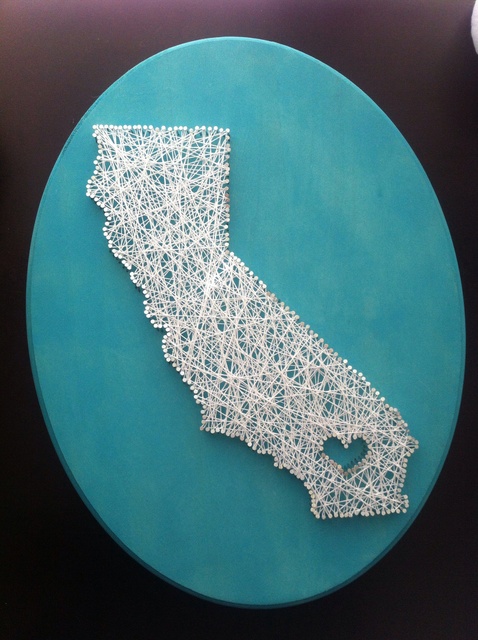
What we like the most about this String Art with the shape of California’s map is the blue oval wood background that reminds the entire ocean that has this state in front of its coasts. You can learn how to make this California String Art at Snapguide step by step.
FLORIDA STRING ART
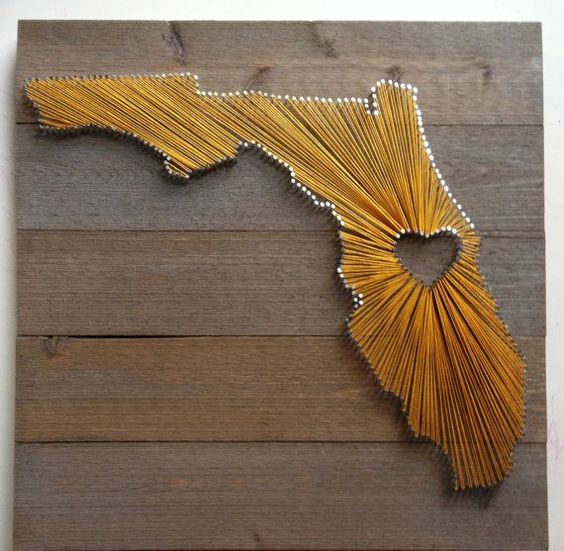
Florida String Art it’s very wonderful. Even more if you design it using yellow or orange threads because reminds the colour of the sun, this golden piece that all of we are searchin for at Florida. We don’t know the source. If you do, please, write us.
NEW YORK STRING ART
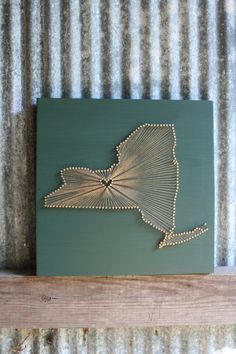
Here we have a New York State String Art that is really lovely and elegant. Firstly, because it is made using beige threads and, secondly, because the wood is painted with a stilish retro green. Sorry, we haven’t found th source, tell us if you know it.
PENNSYLVANIA STRING ART
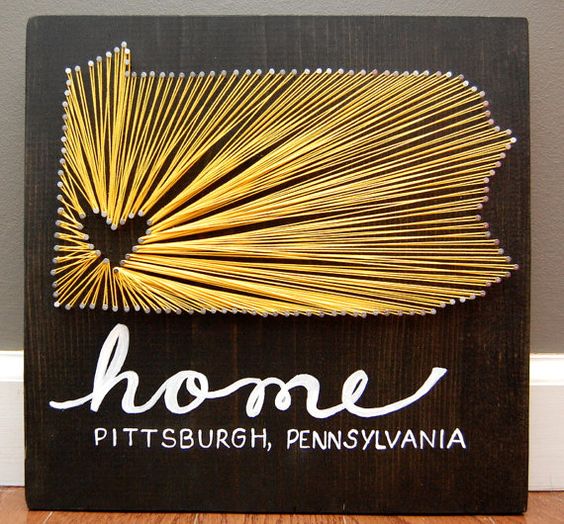
You can add some lettering to the piece, as we see in this String Art where the word “Home” has been added and “Pittsburgh” is marked in a special way. You can make it yourself or buy it at Etsy.
VIRGINIA STRING ART
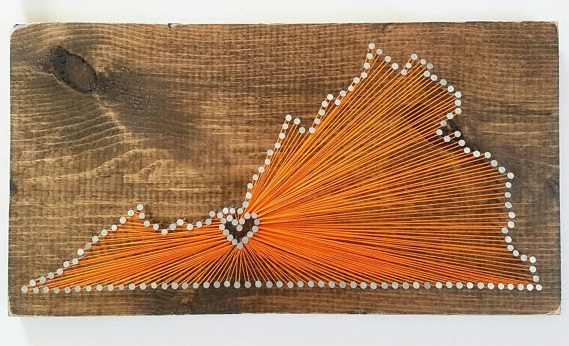
Virginia state shape or outline it’s funny because it seems a mountain. This is a sample of how well it can be to use orange threads on a dark wood background. Like all the previous ones, it also has a heart in the middle pointing out a special city or town for the person who makes the craft. You can do it yourself or buy it in Etsy.
WASHINGTON STRING ART
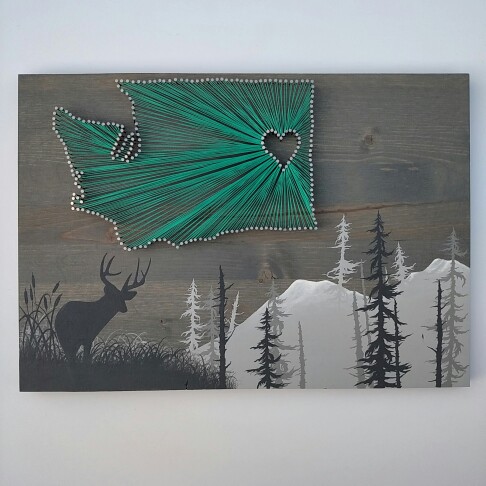
We finish with this wonderful Washington Sting Art. The special thing on this piece is that the wooden background has a drawing of mountains and a moose, the typical landscape of this state. We do not know the source, we’re sorry.
We hope you enjoyed these String Art States and that you are fancy making one with the map of your state, city or your town. Soon we will see another post with two state maps designs. See you, guys!

Hi, guys! How are you? In our previuos posts, Mandala String Art, step by step, we have already seen how to make a Mandala String Art on a video tutorial. Today we are going to show us more impressive mandala String Art designs that can inspire you to create new shapes and crafts.
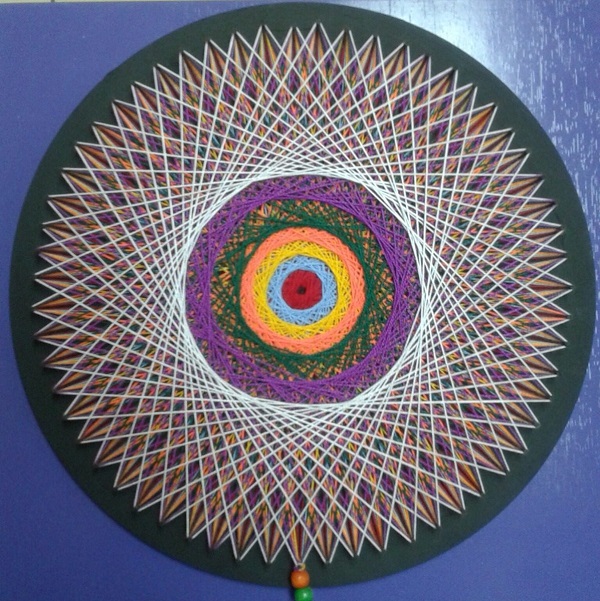
First of all, we want to talk a little about the mandalas. In case you do not know, the mandalas are spiritual symbolic representations of the macrocosm and the microcosm, used in Buddhism and Hinduism. They are usually circular shapes that have a center from which perfect geometric shapes emerge.
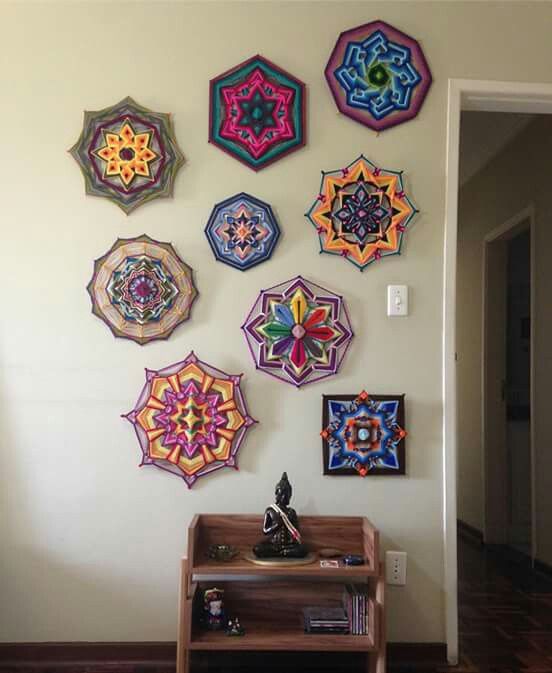
These pieces can be great to decorate a teashop, a religious articles store or a meditation room, due to the fact that mandalas help to relax and meditate, as we can see in the previous image. Then, we will see some stunning designs because of their shapes and the color of their threads.
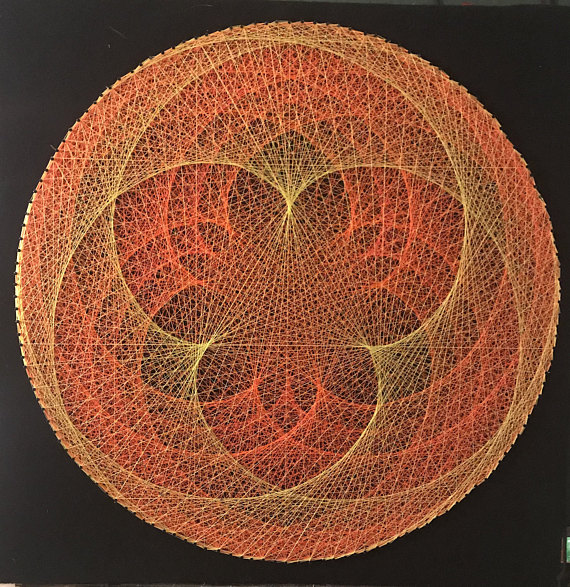
We start with this wonderful and complex mandala in orange and yellow tones. We can appreciate many geometric shapes within the circle. You can buy it on Etsy.
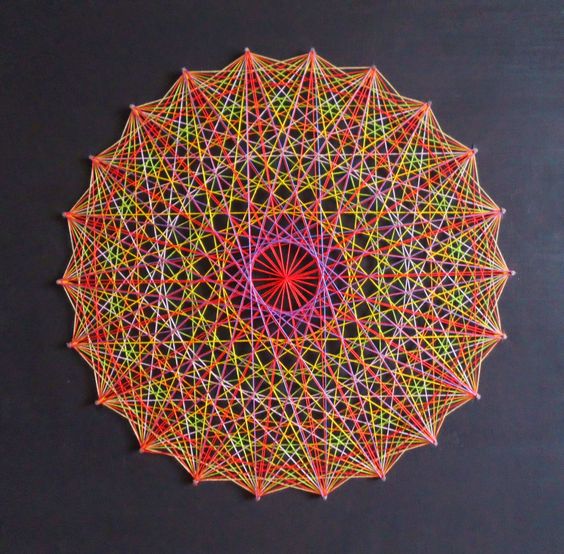
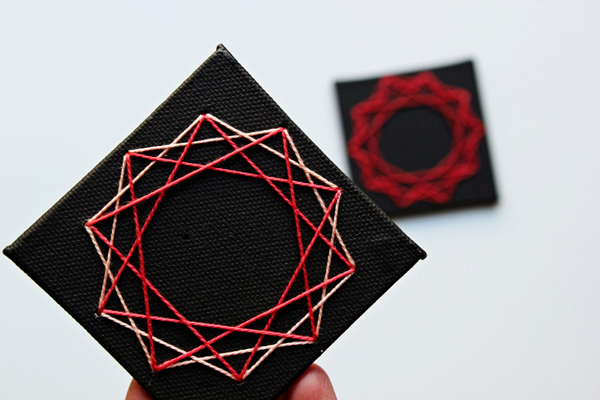
This other mandala String Art has no circular shape, although it seems. Actually it is a geometric shape with 22 points or vertexes. We really love the mix of colours used.

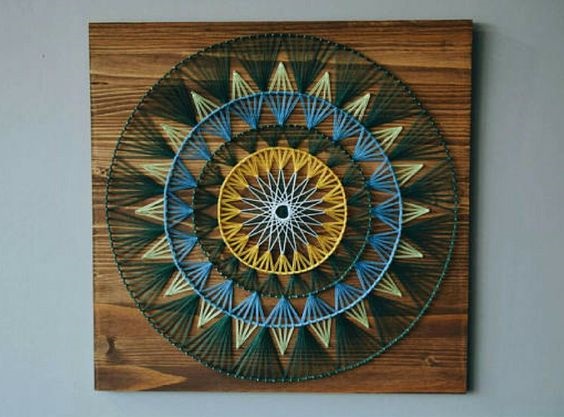
Notice that a mandala String Art can be ever better if we make it on a round wooden base. This is made by Crafty Starling with cherry wood and is amazing.
For this, byHANDstringart has used a thicker type of yarn or thread. This is mandala String Art easier to make, their shapes and figures are simpler, but still looks great.
We really like this gradient color from blue to green for a String Arty mandala. Absolutely gorgeous, made by the hand of RaesCraftyCreations.
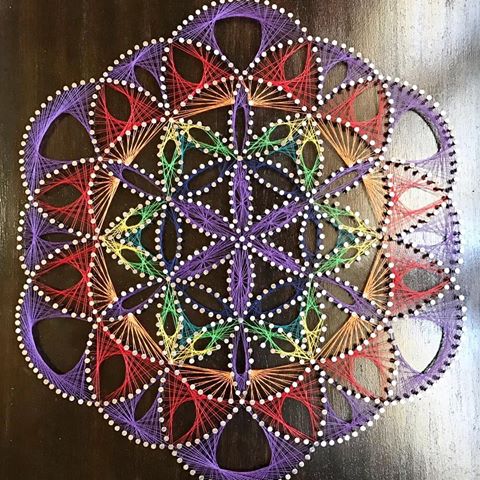
You can also make Mandala String Art with some blank spaces inside, like this design with rainbow colours threads created by @entrehilosuy.
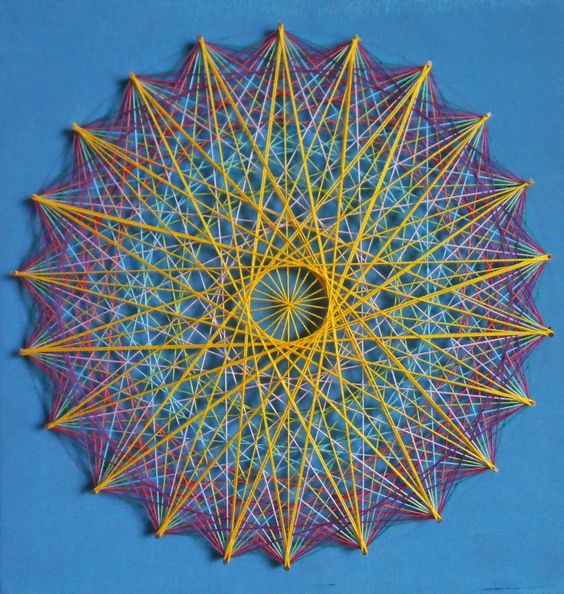
This mandala String Art, also forming a 22 vertex polygon is great because of the striking colors he has used. The shape departs from the central yellow point and comes out with several radius and a gradient is made at the same time. This work is by Mandalas Olho de Deus.
This mandala String Art is special because it is made with blue threads that glow in the dark. In addition, its figures are wonderful and seems like a lotus. A work made by MagicLineStore.
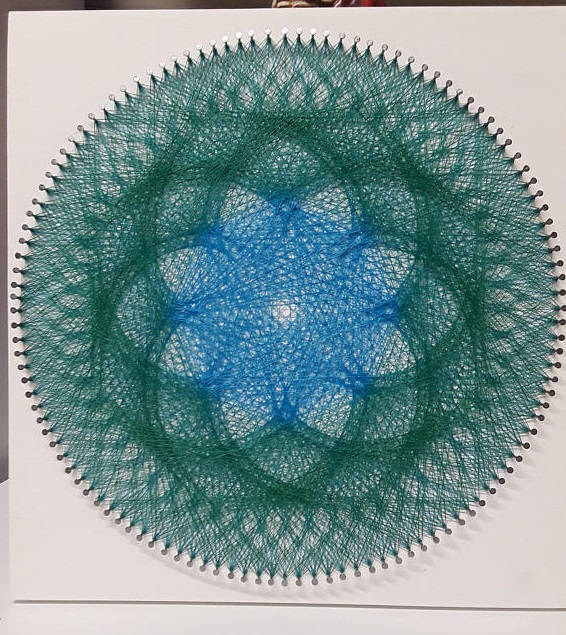
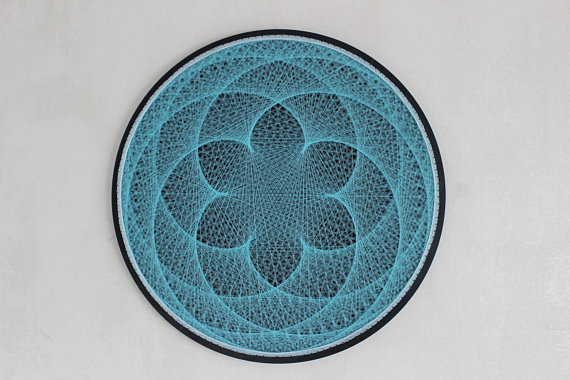
Form concentric circles in the middle that look like an eye is a good start for a mandala String Art, as we can see in this piece made by ESTREDAYENU.

This design is similar to the previous one, follows the idea of concentric circles and is something appreciated in a mandala.
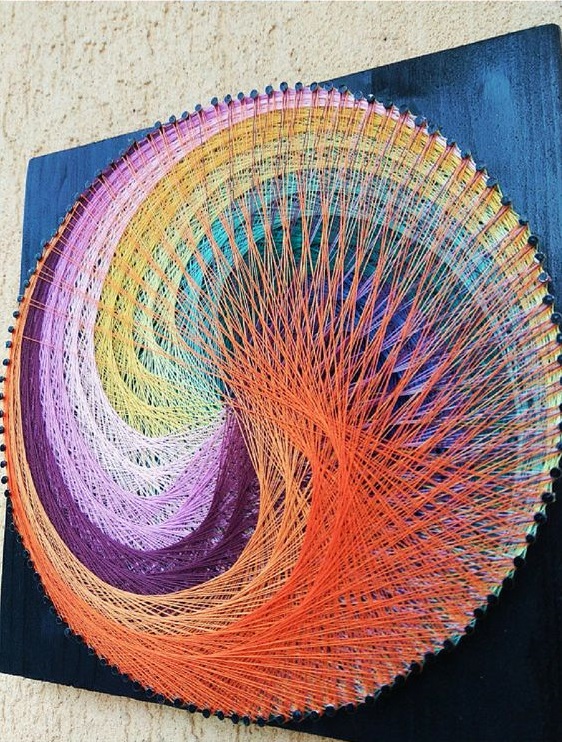
The swirl is not a very common figure in the mandalas, but, nevertheless, it has a central point and is circular, so it can enter this category.
We hope you have enjoyed these mandala String Art designs and we hope that now you are feeling like making a DIY mandala String Art like one of them to decorate your room and that it helps you to concentrate and meditate.

Hi, guys! How are you doing? Spring is coming, the sun is coming, so… what if we make some sunglasses String Art to decorate our home or store to add this new sunny taste to the atmosphere? If the lenses of your sunglasses are broken, you can buy a new pair of replacement lenses in this website: Sunglasses Restorer or you can use the frame (or the broken lenses) to make the following String Art workpieces. You can use the frame as template for a small piece or add them to the composition to create a new volume effect.
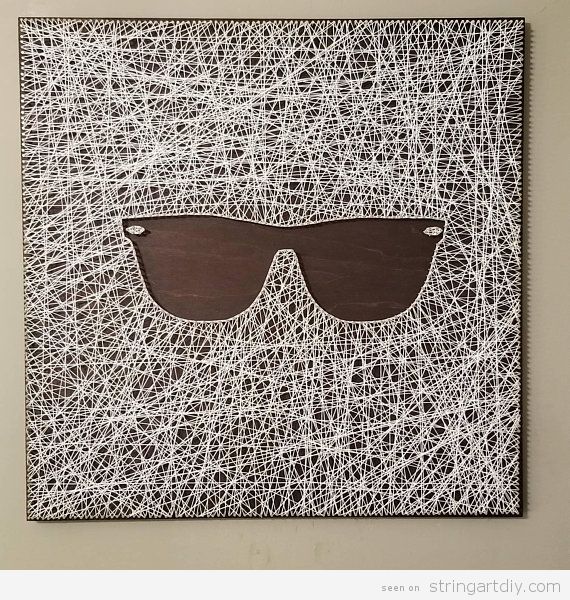
What is clear is that to create this String Art, the crafter has used a real sunglasses frame to create the negative effect where the sunglasses shape are blank (well, we can see the dark wooden base behind) and all around them is filled with white threads using the String Art technique. This design is very nice, simple and elegant.
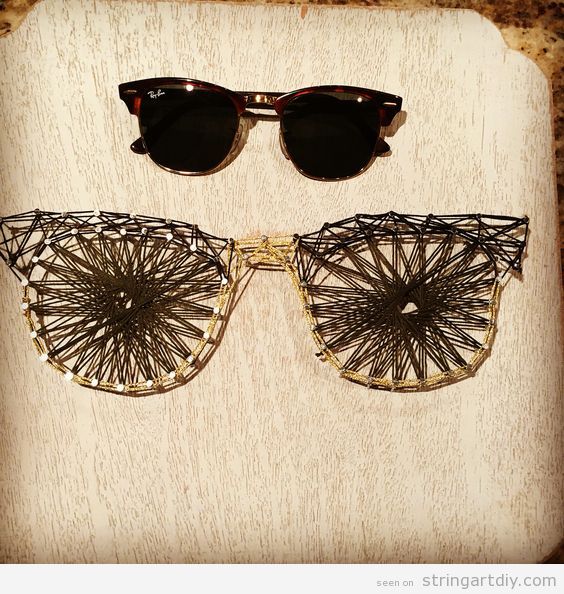
In case you love your Rayban sunglasses so so much, you can add or glue them to the String Art copy to create a volume effect or just use the sunglasses as a model to copy. Notice that the crafter has used a special wood base that add a traditional and fancy look to the work, following the Rayban style.
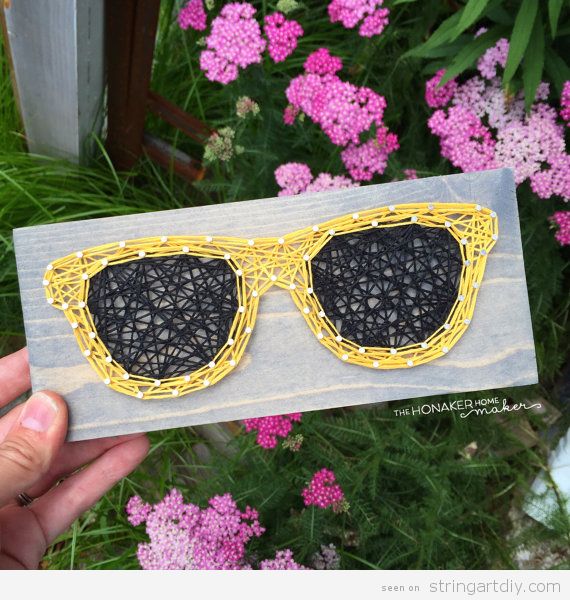
Let’s move to the color that make us feel that the sun is above us and making us feel alive and happy. Evidently, the yellow! We really love this yellow sunglasses String Art made by The Honaker Home maker. This design is lovely for a room, a coffe shop or a clothes and accessories store decorating, don’t you think so? Pay also attention to the wooden base painted in gray (but still letting the woodgrain show through), because is the color that fits the most with the yellow.
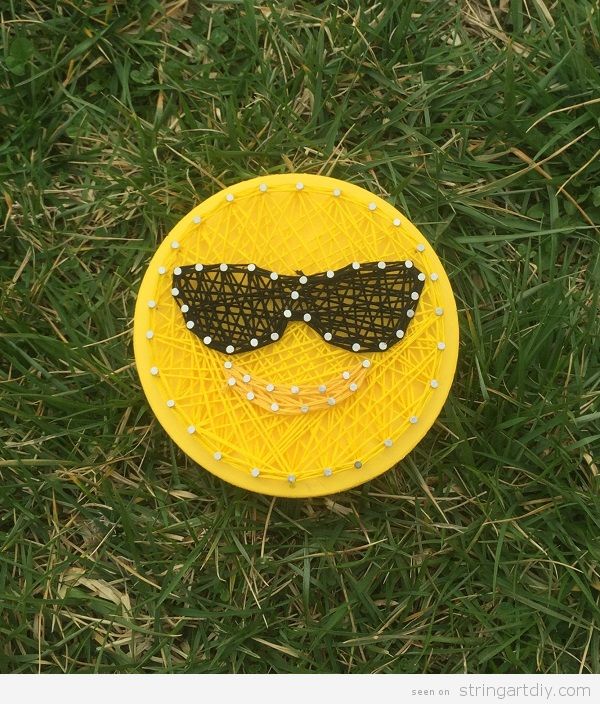
If we are looking for funny sunglasses String Art, what is better than this sunglasses emoji String Art? You will need a round wood base to make it, that you can cut or you can buy already cut, paint it in yellow and, then, make the emoji shape. Don’t forget the smile and, obviously, the black sunglasses.
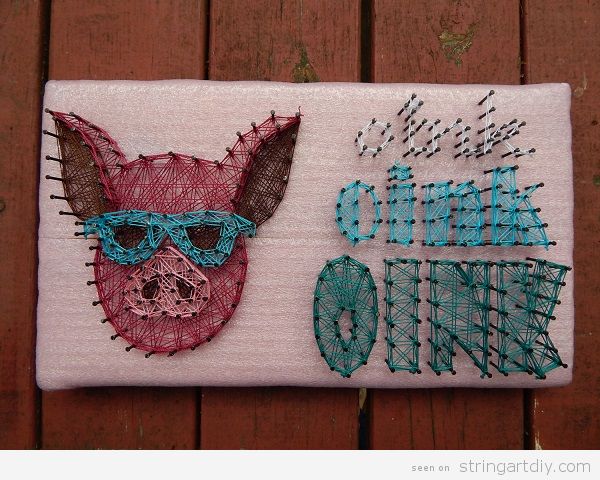
Let us allow our minds to be free and creative. If we are able to reach this point, we can produce String Art pieces as original as this one. Once you have the idea of the sunglasses String Art you can try to put them over other figures, like a person or an animal. For example, put the sunglasses on a pig face. He seems so cute, good-looking, a bit cocky but happy! That’s just an idea. We suggest you to choose a cat or a dog if you don’t like pigs, even your pet, and put on them some cool sunglasses.
As always, we hope that you have enjoyed these String Art ideas and we encourage you to go to the DIY superstore, get some wood bases, nails and threads and make some of these pieces to decorate your place. Thank you for reading and see you soon!

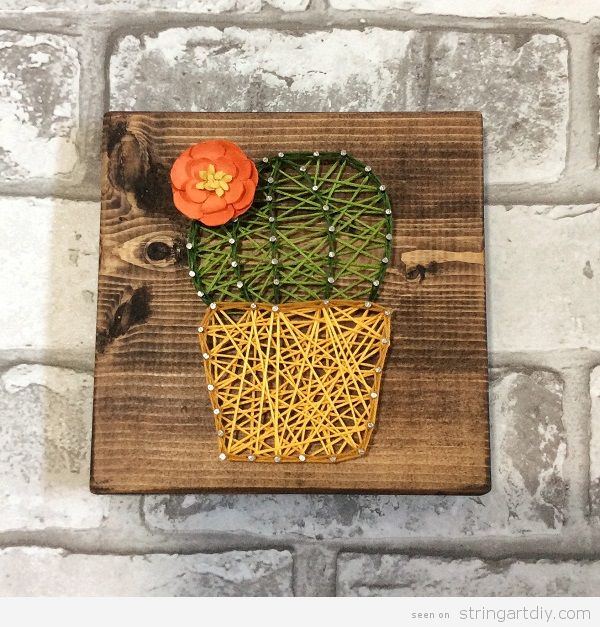
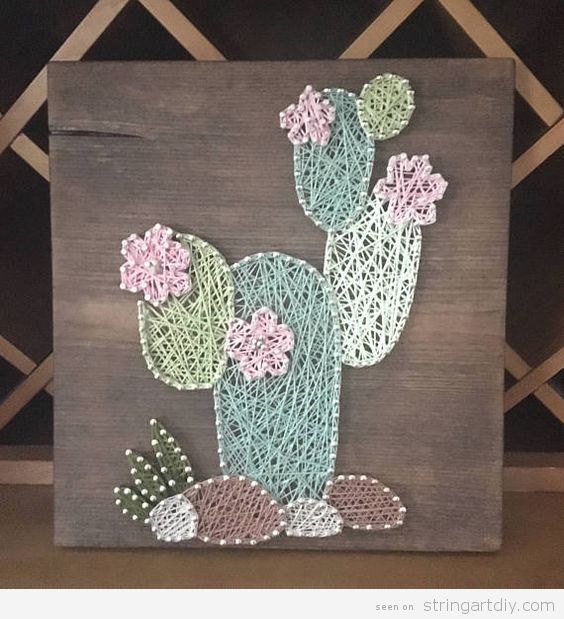
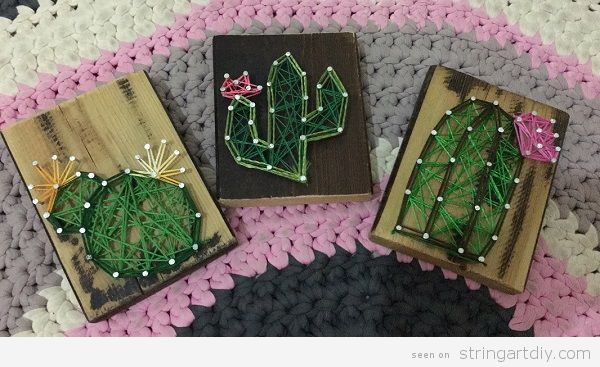
We can’t understand how, after so many years of bloging, we haven’t dedicated yet one post to talking about cactus Strings Art! Luckily, today we have thought about it and we have looked for the 10 best cactus String Art, so, here we have our Top 10. As we can see below, some of them are regular cactus or succulent, others are cactus with flowers and others are cactus that can be found in flowerpots or in the plains of the desert. Let’s take a look at these 10 works.
THREE CACTUS
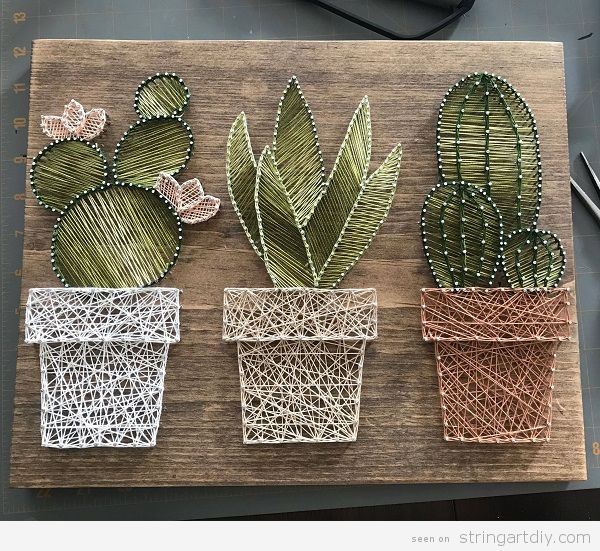
We love this String Art with three different cactus planted in three pretty pots, each one of a color. Notice that one of them has pretty flowers. You can DIY or buy it on BrittasDreamDesigns.
CACTUS AND SUCCULENTS
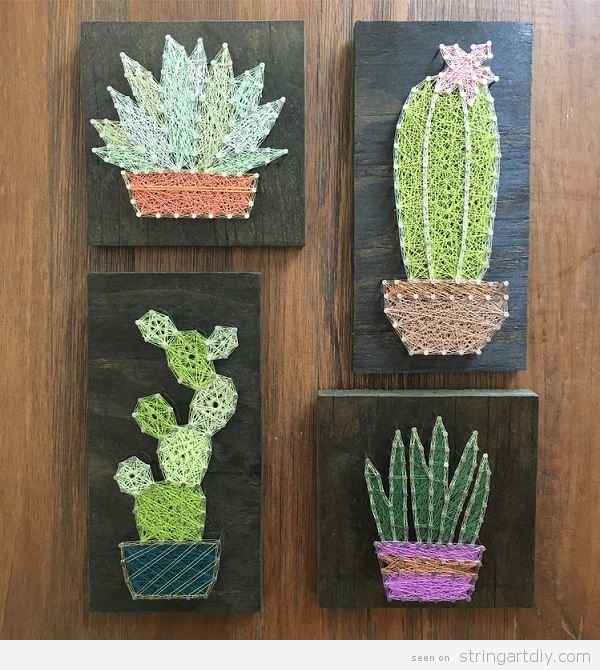
Pay attention also to these beautiful succulents and cactus on a dark wood base. We love their shapes and colors. This work was created by Rachel Herring.
BIG CACTUS
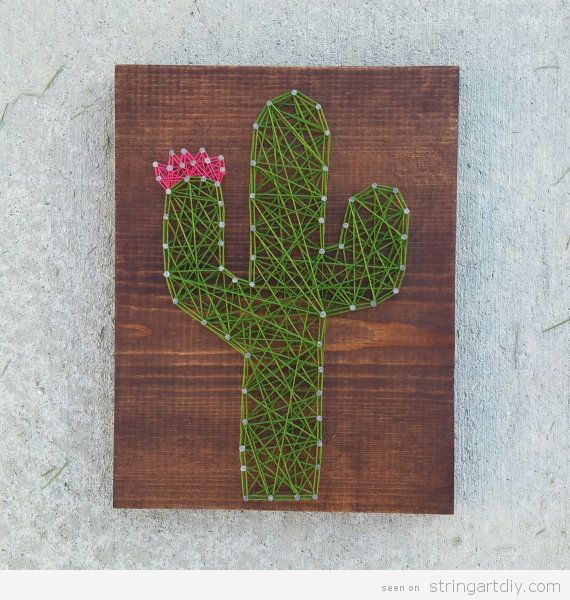
We leave the flowerpots and we take a look at the plains of the desert to imagine a big cactus like this one. It’s a nice piece that you can buy at Etsy or, if tyou prefer Do It Yoursef, so we encourage you to watch this tutorial by Love Tempe.
Here you haver another tutorial step by step by TurquoiseBoutiqueStudio that could help too to make this cactus String Art.
CACTUS WITH CLOTH FLOWER
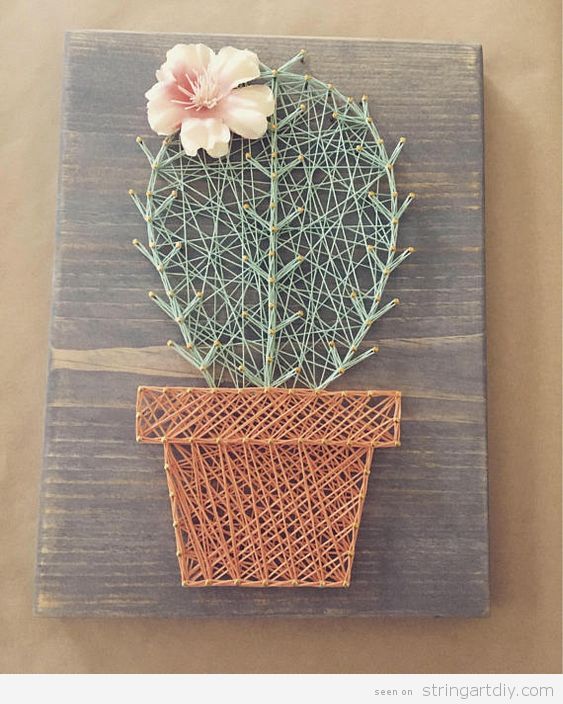
Sometimes it is very good when we add an object of another material in a String Art work. For example, in the next two cactus String Art, the flower is made of cloth and it looks wonderful. This one is made by BrittasDreamDesigns and the next one with the orange flower is made by Locker Pivots.
PASTEL CACTUS
If the String Art is to decorate a nursery, it is better to make it with soft and pastel colors, like this cactus full of flowers and beautiful details. It’s no longer avaliable on Etsy but you can Do It Yourself having it as a reference.
CACTUS WITH FRINGES
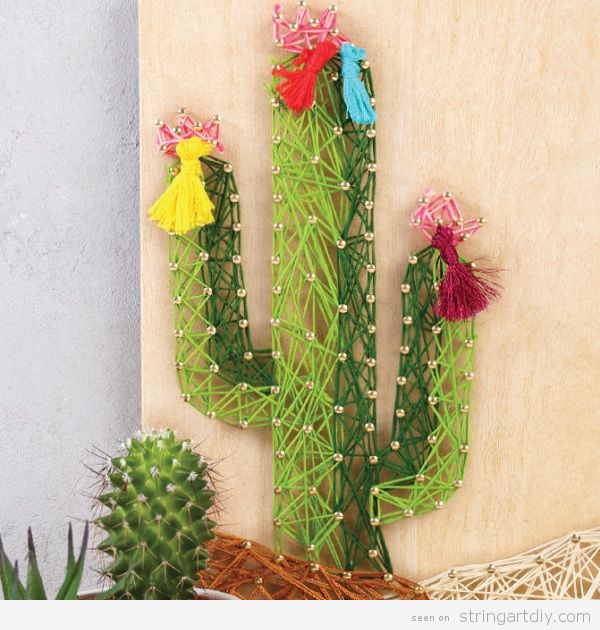
If you are tired of cactus flowers, you can add something more original, like pompoms or colored fringes. You can see the full tutorial step by step visiting Perles and Co.
THREE CACTUS ON WOOD SLICE

In case you would like to add something different on the cactu String Arty, you can also change the base from normal wood piece to a slice of wood. You can buy it on hannahhandcraftedco or take it as an example and try to imitate it.
GEOMETRIC CACTUS
Another original way to make these String Art cactus is by drawing them in geometric shapes. It gives a much more modern look. We have found it on Pinterest.
REAL CACTUS ON STRING ART
To finish, we turn it around and we offer you a variety of a geometric String Art with real cactus planted in the wood base, as if they were flowerpots or vertical planters. Is really really original and you can found the whole tutorial step by step on Brit.co.
We wish that all these cactus String Art have pleased you and that you decorate your home walls with them. We encourage you to do it yourselves and tell us how it was. See you soon!

Hello everyone and welcome one more time to our blog. Today we are going to show you some Arabic String Arts where we will see some arabic letters, names in arabic, arabic phrases and islamic verses. Currently I am studying arabic lenguaje and arabic calligraphy and I feel that I am a lover of this culture, so I am going to try to translate each one so you know what it says. Ialla or let’s go!
ARABIC LETTERS
Let’s start with some arabic letters String Art with beautiful calligraphy.

The first is the letter “و”, we pronunce it as “waw” if it’s isolated or “uu” if it’s in the middle or the end of a noun. It also works to join two phrases, is our “and”. At the site nailstring.com you can see more works like this one by Emine Kara.
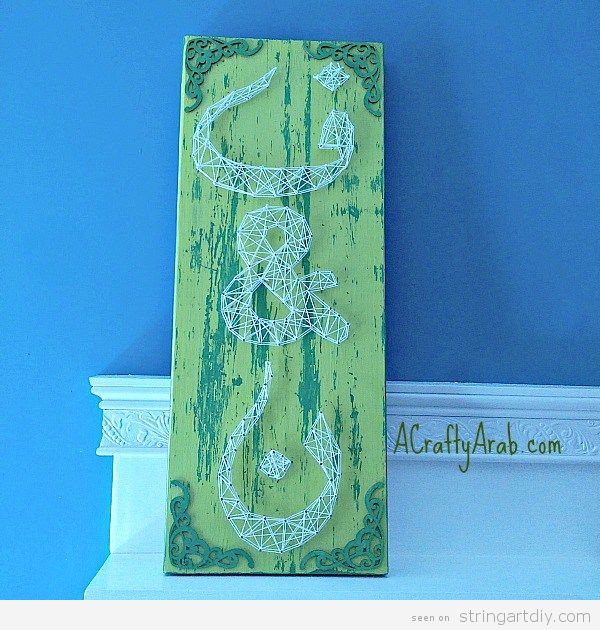
These two letters are the initials of a couple made by A Crafty Arab for their wedding day. These “ق” (faa) and “ن” (nuun) letters. You can see the full tutorial step by step in his site.
MY MOTHER IN ARABIC

You can also choose to pay tribute to your mother with this fabulous String Art that says “أمي” (Umi), that is “my mother”. We really love this beautiful design by Jwana Al Sha’lan and you can see more pictures at his Behance Gallery.
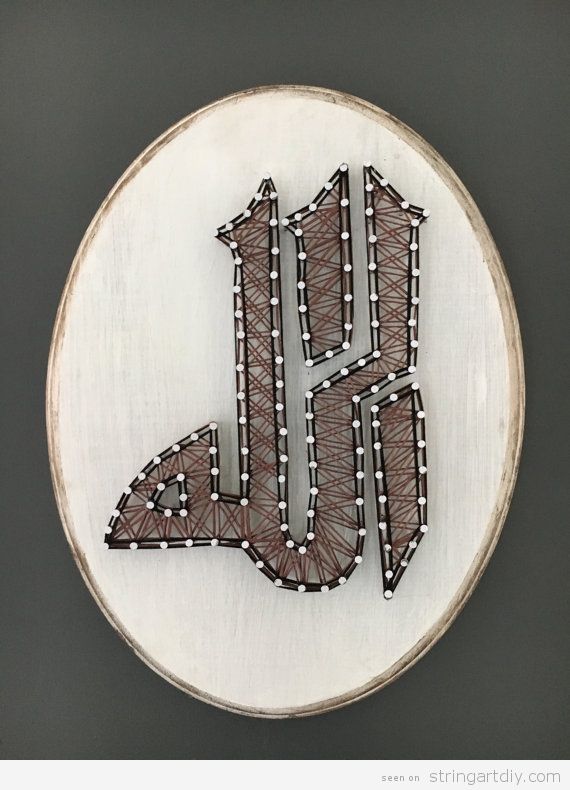
NAME PATRICIA IN ARABIC

An excellent option is also a String Art with your name in Arabic. In this created by Monica Artwork we can read “باتريثيا”, witch means Patricia, although it is really written “Baatriiziaa” because the letter “P” and “C” do not exist in Arabic.
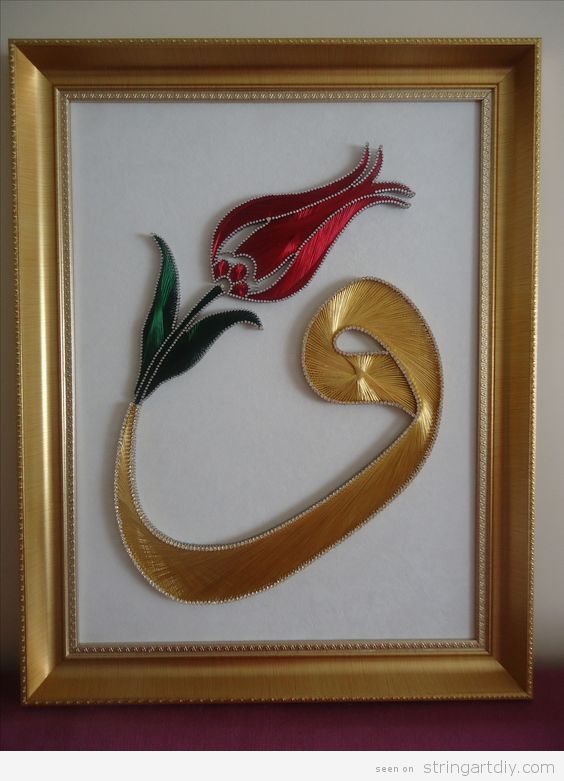
PATIENCE IS BEAUTIFUL IN ARABIC
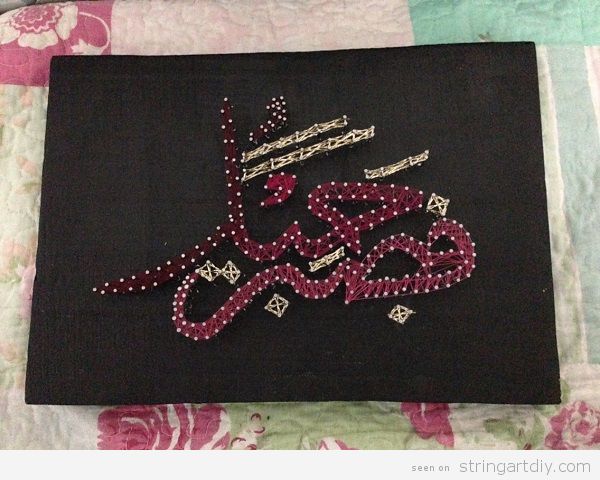
Another idea is to write a beautiful sentence in Arabic, using a beautiful calligraphy, for your String Art. This one says “فصبر حميل” (“fa sabrun jameel”) and it means “patience is beautiful”. We have seen this beautiful Arabic String Art at Izza Shahid Pinterest.
ALLAH
Now we start with religious Arabic String Art.
“الله” Allah means God and there are many ways to write it in many different calligraphies, each one more beautiful than the other. You can buy this on Etsy
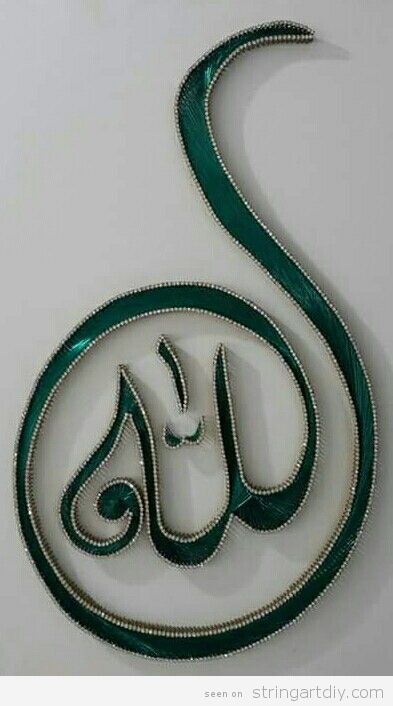
This one is stunning due to its design and the bright green thread used.
THANKS GOD IN ARABIC
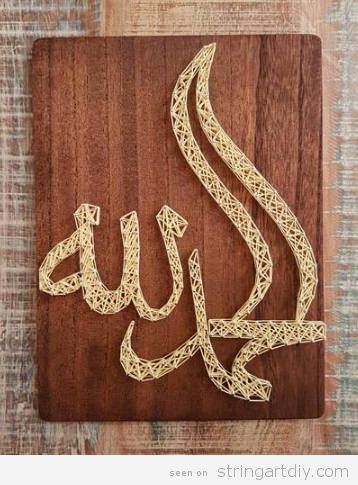
In this other String Art we can read “الحمد لله” (“alhamdulillah”) is literally “Praise be to Lord”, but muslims use it as “Thank Lord”. Pay attention to his beautiful calligraphy! If you like it, it’s avaliable on Etsy.
THE MERCIFUL IN ARABIC
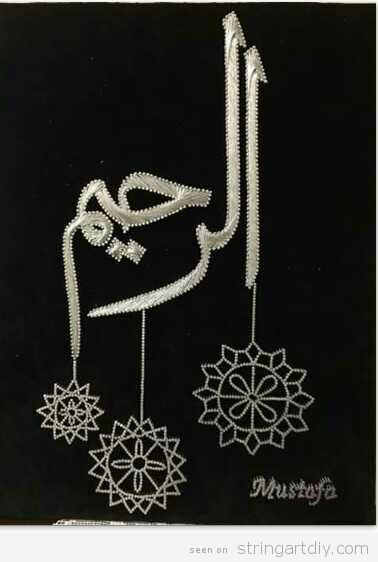

“الرحيم” means “The merciful” and is one of the names of Allah. As you can see in these two islamic String Art, there are many ways to write the same by using several calligprahies and ornaments. The second one it’s on sale at Etsy.
MY GOD DON’T BE FAR FROM ME IN ARABIC
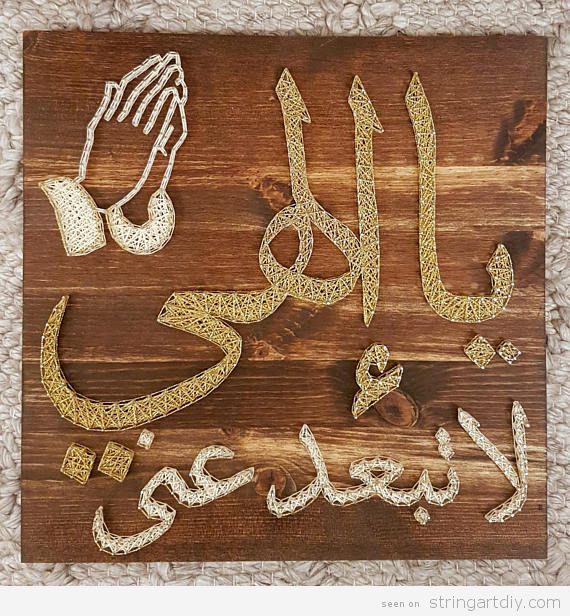
We finish this article with a verse that says “يا إلهي لا تبعد عني”, meaning “My lord, don’t be far from me” and it’s calligraphy it’s impressive. It0s avaliable on Etsy.
We hope you liked these arabic String Art and see you soon!
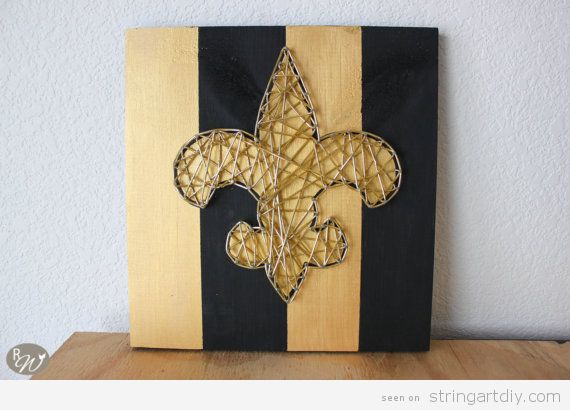
Mardi gras is coming, so today we have thought about Louisiana and more specifically, obout New Orleans and we have decided to dedicate an article to Louisiana Themed String Arts. As you can see, there are colors and motifs that are repeated. According to colors, purple and yellow because they are the LSU team colors, as well as the purple, yellow and green because they are Mardi Gras flag colors. Regarding to the motifs, fleur de lis is repeated, emblem of New Orleans, so as the shape of the map of Louisiana and also the eye of the tiger appears, among others.
Let’s take a look to these Louisiana Themed String Arts!
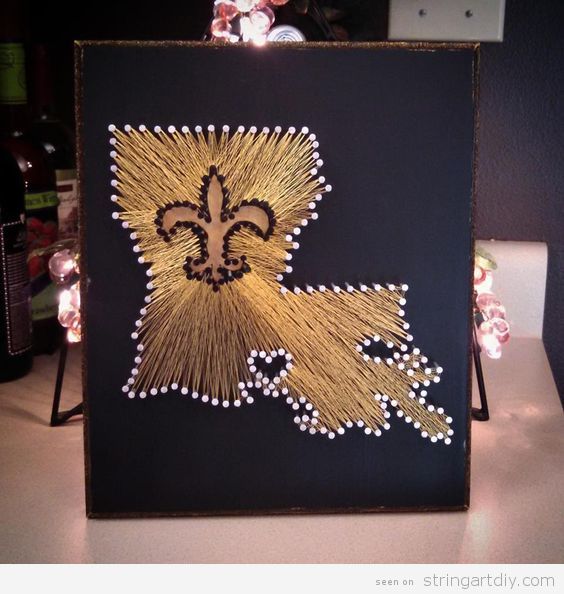
LOUISIANA MAP STRING ART
We start with this Louisiana State map String Art, which has a heart in the middle wearing the colors green, yellow and purple, as well as the initials NOLA, acronym of New Orleans, Louisiana.
Source: ShopAmbiguouS
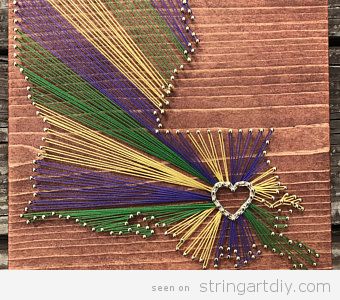
We also love this other version of the map of Louisiana filled with threads of the three colors (yellow, purple and green) and the heart in white. More simple but more impressive. Sorry, but we don’t know the source!
More elegant and sober is this other Louisiana Map String Art with the fleur-de-lis in the middle and wearing the New Orleans Saints team colors.
Source: MCStringArt
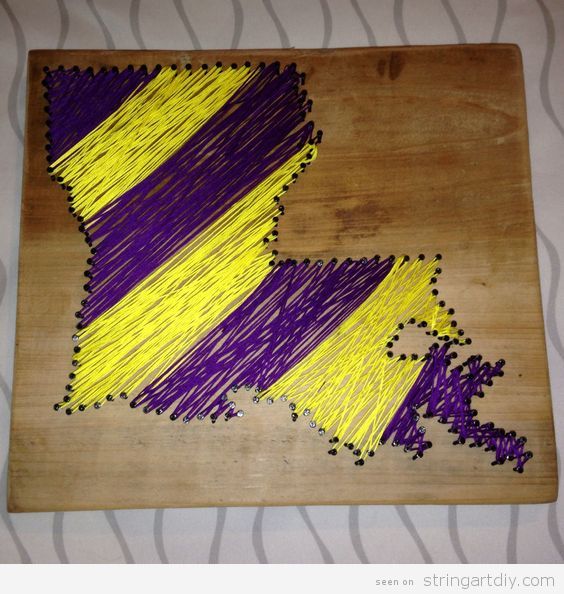
Instead of that, you also can fill the Louisiana map using the LSU team colors for the threads, makins strips!
Source: Pinterest
LSU STRING ART
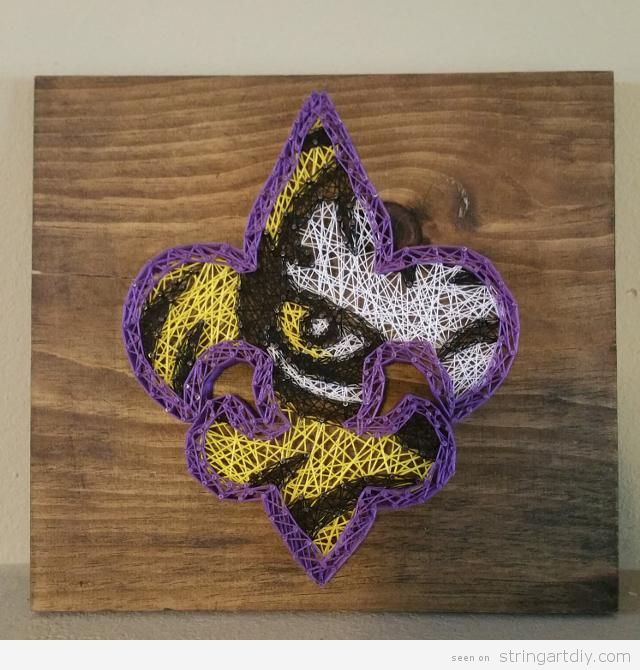
Now, let’s focus on LSU football team and this Tiger Eye Fleur de Lis String Art because it’s stunning! As you can see, the tiger eye is inside the fleur-de-lis shape, all using purple, yellow, white and black threads.
Source: Varagesale 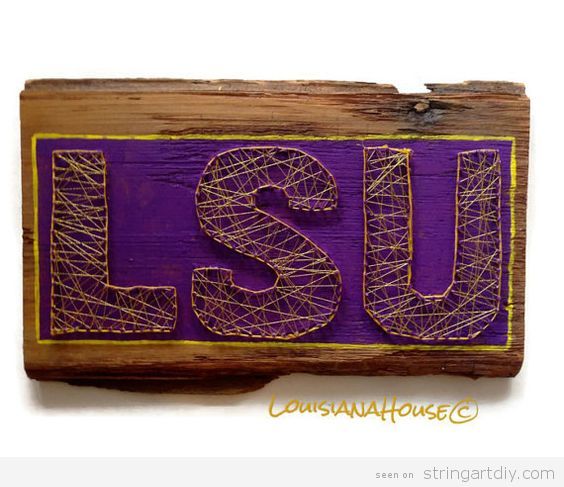
It is also a good option to create a String Art with LSU initials using yellow threads over a purple painted backgorund. A simple and effective design.
Source: Lousiana House
NEW ORLEANS SKYLINE STRING ART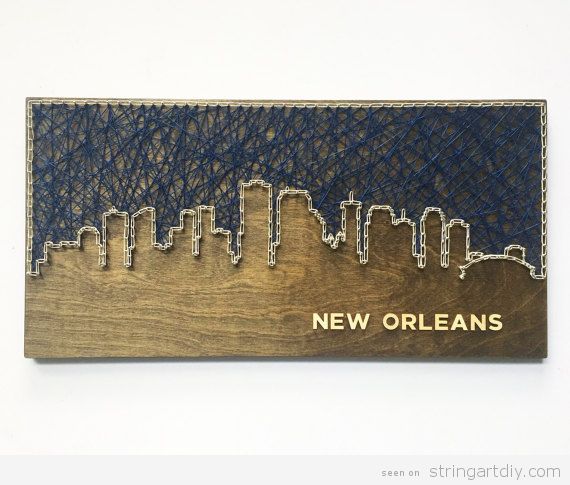
In case you prefer to pay tribute to New Orleans city, then you can make a String Art with its skyline, like this one. As you can see, the design is in negative, since the threads are the sky and in the shape of the buildings.
Source: CactusCustomDesigns
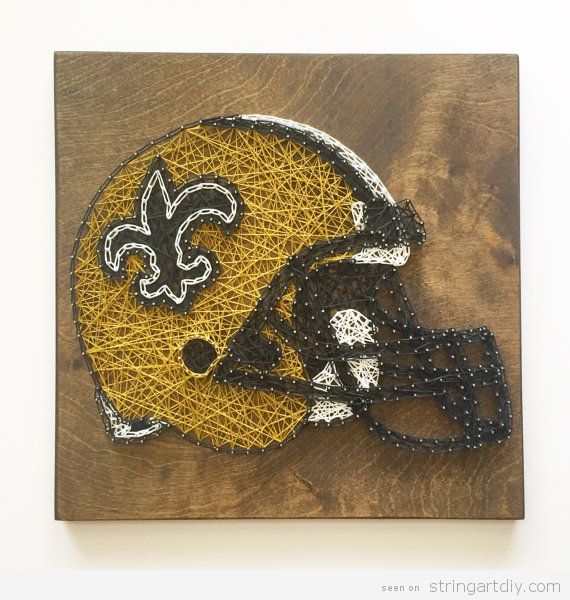
NEW ORLEANS SAINTS STRING ART
Are you a New Orleans Saints team fan? Then you will love this String Art with the fleur-de-lis on a background of golden brown and black stripes.
Source: TheRusticWillows
MARDI GRAS STRING ART
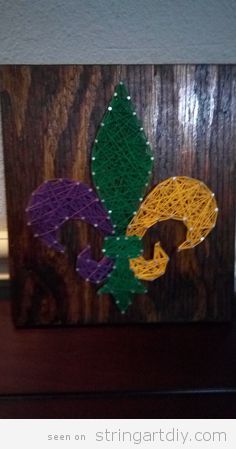
If we mix fleur-de-lis shape and yellow, purple and green colours, we have the representation of New Orleans Mardi Gras. So this String Art is wonderful to celebrate that! Sorry, but we haven’t found the source.
We hope you liked these Louisiana Themed String Arts and we encourage you to do a DIY to celebrate the greatness of this state. We hope also to see you soon here, more posts are coming!
Our favorite time of the year has arrived: Christmas is here! And it’s just the time to send Christmas cards to our beloved ones. What do you think if we make them ourselves? Today we propose to you to make String Art Christmas cards with the shape of a christmas tree, an angel or a snowflake. For some of them, we give you the link to visit the tutorial. If not, we provide to you the free pattern or the free template to make it easier. Let’s go!
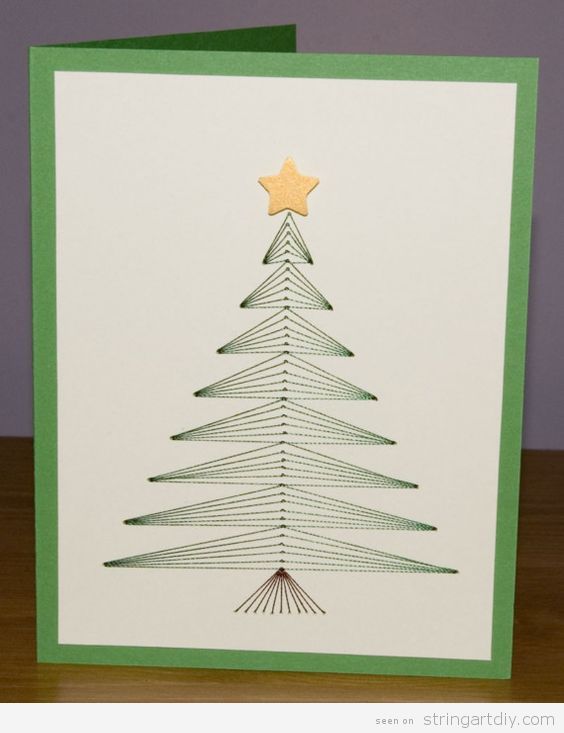
MODERN CHRISTMAS TREE STRING ART CARD
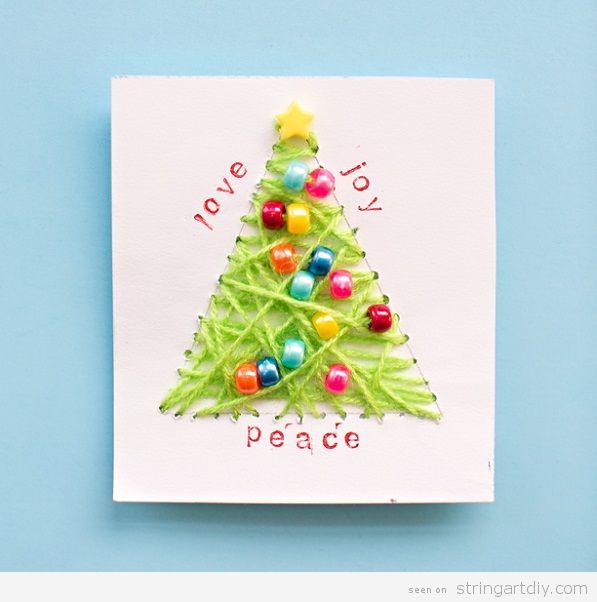 To start with, here you have this modern Christmas tree card, very easy to make, including some beads as a decoration. If you add words like “love”, “joy” or “peace” is even more lovely. You can see the full tutorial step by step here: Hello, Wonderful. Simple and funny to make with kids, but be careful with the needle!
ANGEL STRING ARTCHRISTMAS CARD
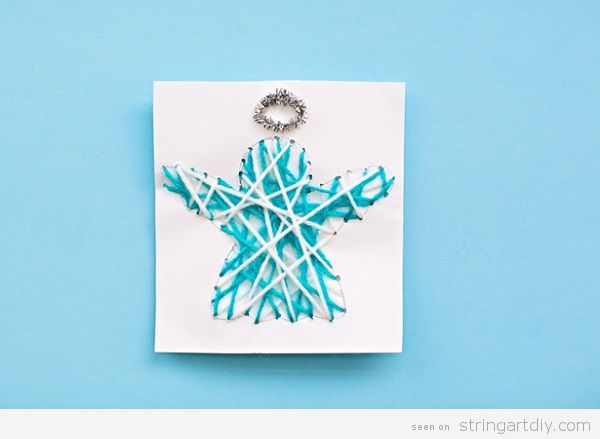
This one it’s also made by Hello, Wonderful, and the process is just the same that the modern tree. Instead of a tree, it’s an blue and white angel. Pay attention to his halo or crown made using silver and very small garlands. So cute!
SNOWFLAKE STRING ART CHRISTMAS CARD
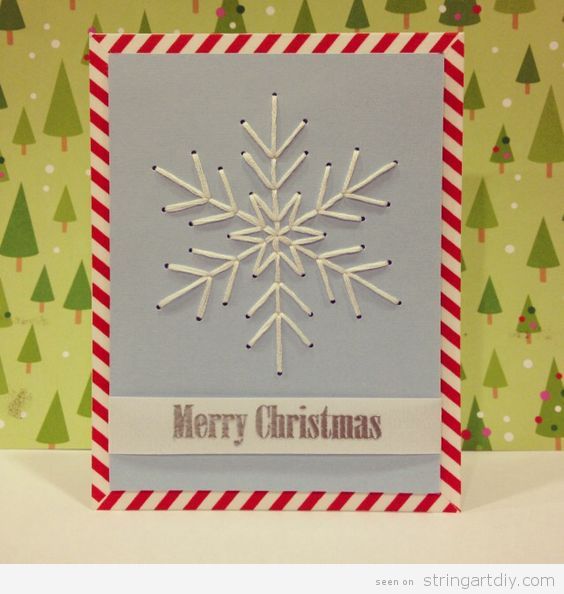
We have found on Jaded Stephanie Pinterest this wonderful snowflake Christmas Card and we think that it deserve a try because it’s a beautiful, simple and modern design.
TRADITIONAL CHRISTMAS TREE STRING ART CARD
If you prefer a traditional christmas tree card instead, here you have another design by dominicInOhio. It’s algo very minimal and elegant. As we can’t bring you the tutorial, here you have a similar patter or template that maybe you can use:
STITCHED TREE CARD
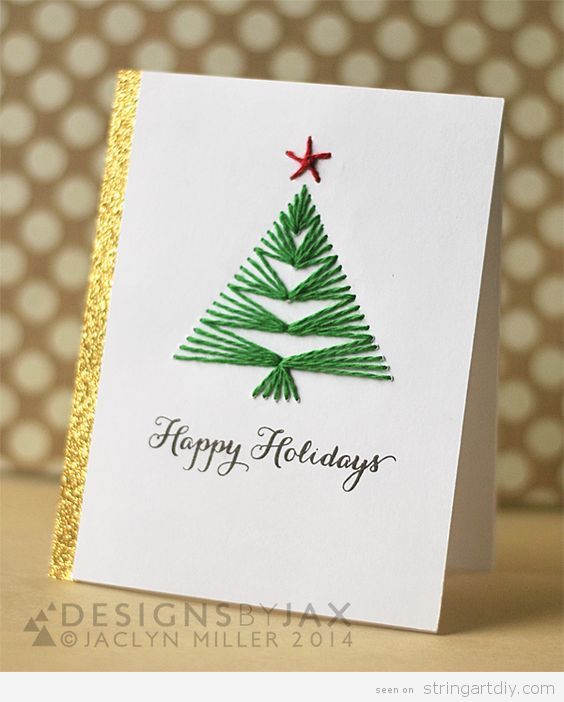
Yes, instead of call it “String aAt card” we can call it “stitched card” because it’s a kind of embroidery work. This project it’s also very easy to make and you can follow all the process step by step by visiting The Twinery. Minimal, elegant and very festive design, indeed, including the calligraphy and the glitter part.
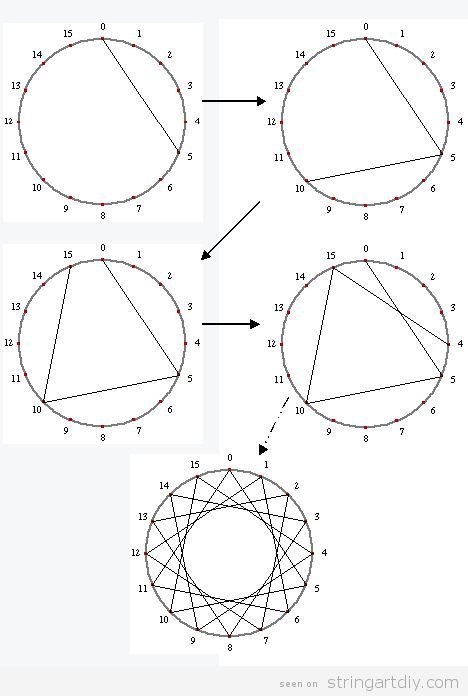
CHRISTMAS TREE MADE BY CIRCLES STRING ART CARD
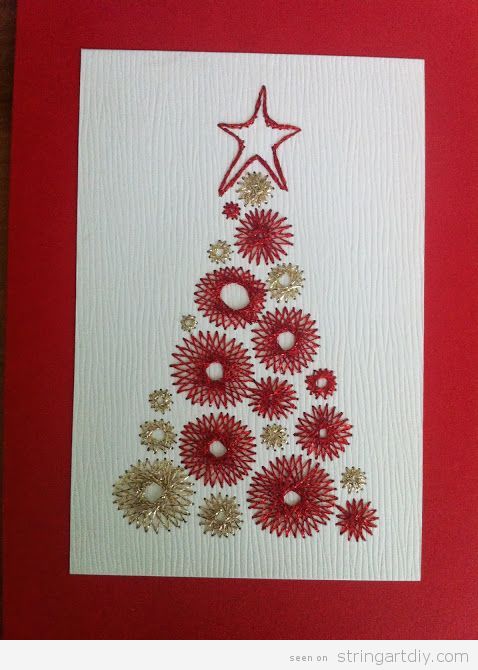
We finish by proposing you this original way to create a Christmas tree String Art card. Its shape is made with red and golden String Art traditional 8, 16, 24, 32 or 40 points stars. Here you have the template to a 16 point star String Art, but the process is the same by multiplying the points.
We hope you enjoyed these String Art Christmas Cards. If you decide to make one, please, send us photos to our Twitter or Facebook. Rembeber: @stringartdiy on Twitter and String Art DIY on Facebook. See you soon and happy holidays!
Recent Comments