Tutorial
Andrea Vlogger Gt show us in this video 2 ways to make a String Art DIY, the “inverse way”, filling with thread all the space left outside the main figure, in this case, a heart and, on the other side, the classic way, filling the figure, in this case, the word “love”, written whith a lovely handwritting typo.
As you can see, she paints the board in blue and in pink. The thing I like the most is that she uses jute or sacking thread to make this project and it looks really great. Don’t you think so?
It’s a really lovely handmade gift to your boyfriend or girlfriend, no matter if it is because of your love, your anniversary or Valentine’s Day.
Well, as always, we engourage you to send your String Art project to us via Twitter @stringartdiy and Facebook String Art DIY!
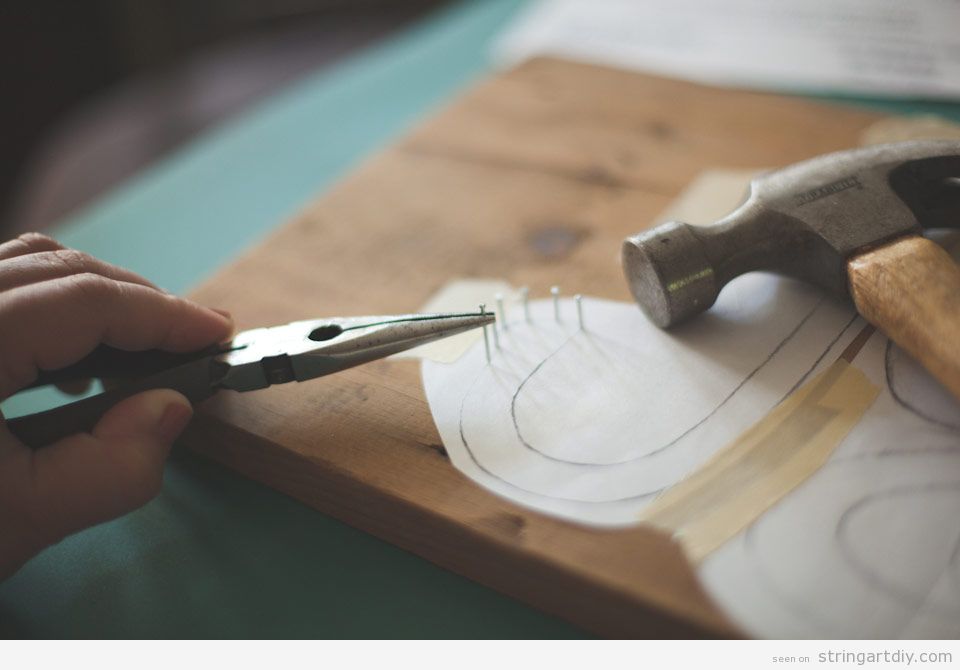
Loo has made this great video to show us how to make a “origami” word gradient String Art. However, you can change “origami” for another word that you love the most.
As usual, you need these materials:
- Letterns pattern printed on paper
- Scissors
- Pencil
- Eraser
- Tape
- Board (1 cm or more, 0,39 inches)
- Newspaper pages
- Nails 1- 1.5 cm / 0,39 – 0,59 inches (the smaller, the better)
- Hammer
- Coloured threads
- Tow or brush (it depends on the paint you have chosen)
OPTIONAL:
- Acrylic paint
- Spray
- Alcohol ink
The steps are easy, we recommend you to watch the video to see all the process.
Enjoy it!
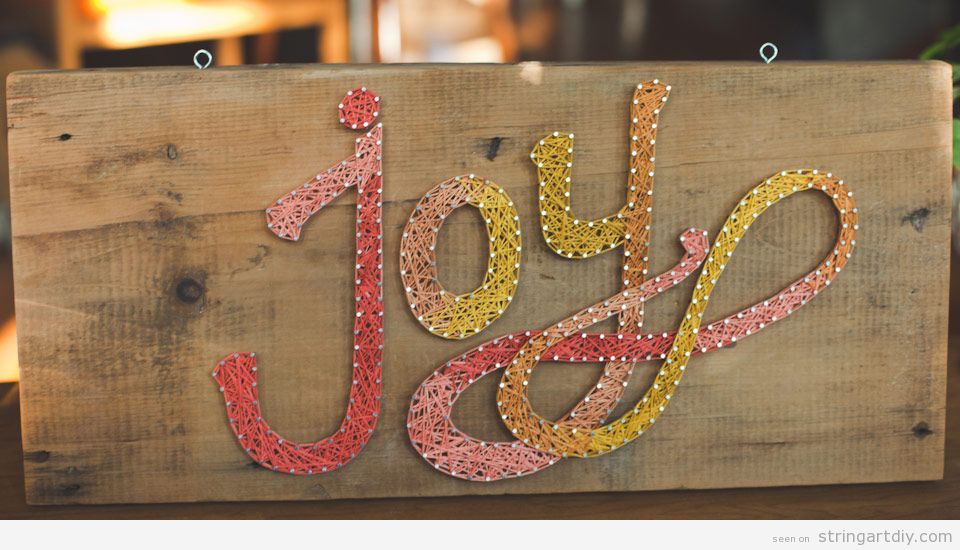
Here you have and easy DIY project to decorate your place. As you can see, it’s a “Joy” word String Art in gradient colours, from yellow to red.
You can follow the steps in this tutorial to lean how to do it in an easy way.
Source: Dear Mckenzie
The result is amazing! isn’t it? It turns out a great craft to decorate a wall!
Source: Loo
As you can see, it worth to paint the wooden box or varnish it in a darker colour and to cover or upholster the inside with a lovely printed fabric.
You can turn this box to into a jeweller o a box to put the teabags inside.
¿Do you like it? Try it and tell us about!
Source: Troom Troom
It is a perfect customized gift so think about making it for a friend or relative!
- Block wood
- Letter pattern
- Small nails
- Crochet string
- Hammer
- Scissors
- Painter’s tape
We hope you enjoy it!
Wow, it’s amazing this hyper realistic portrait made usting String Art technique! As you can see, you have to start with a beautiful pic and then clue a lot of nails aorund the most important shapes and then, use green thread to mark the most important lines. Pay attention: this video is subbed in english, so you will not have problems with the instructions.
As you can see, only the flower is in a gradient orange. The girl is in black and white gradient. It’s and advanced level project, so if you are a begginer, you must start with an easier idea.
I just love it. It’s a beutiful idea, a handmade gift for a very important or special person to you.
Look more works at Israel Narváez Romero Instagram.
HelloKids-us show us in this video a great way to make a Geometric String Art, even to make with kids. Look how they use clothespin in order to not to get damage in the fingers when you hammer the nail.
At the same thime they are having a great time making a craft, they learn geometry and maths. Just a perfect work to make with kids!